
How to schedule content across multiple communities in brand ecosystem?
Overview
Scheduler in Brand Control Center allows you to automate how social content is:
- Imported from connected social handles
- Routed to selected communities and groups
- Published - either manually, automatically, or on a defined cadence
Instead of manually importing and posting each piece of content, scheduler enables structured automation with built-in safeguards, validation rules, and governance controls.
This feature is designed for brands that need:
- Scalable content operations
- Predictable publishing cadence
- Controlled automation
- Community-specific routing
- Centralized oversight
What Scheduler Does (At a Glance)
Scheduler allows you to:
- Automatically fetch posts from selected social handles
- Assign content to specific communities and groups
- Choose how content is published:
- Save as Draft
- Auto Publish Immediately
- Scheduled Publishing
- Enforce time buffers to avoid conflicts
- Manage multiple schedulers across brands
- Pause, edit, or delete automation anytime
Key Concepts (Important Before You Begin)
Understanding these terms is critical.
Import Frequency: How often the Brand Control Center fetches content from your social handles?
Options: Hourly, Daily, Weekly & Monthly
Posting Type: What happens after content is imported?
Options:
- Save as Draft
- Auto Publish Immediately
- Scheduled Publishing
Time Buffer Rules
Scheduler enforces protective timing rules:
- 4-hour margin rule (Daily/Weekly/Monthly when applicable)
- 1.5-hour minimum margin (Clip It & Upload scheduling)
- Past time selection is not allowed
- Time slots before buffer are disabled
These rules prevent overlapping automation and ensure clean execution.
Sample Info Messages:
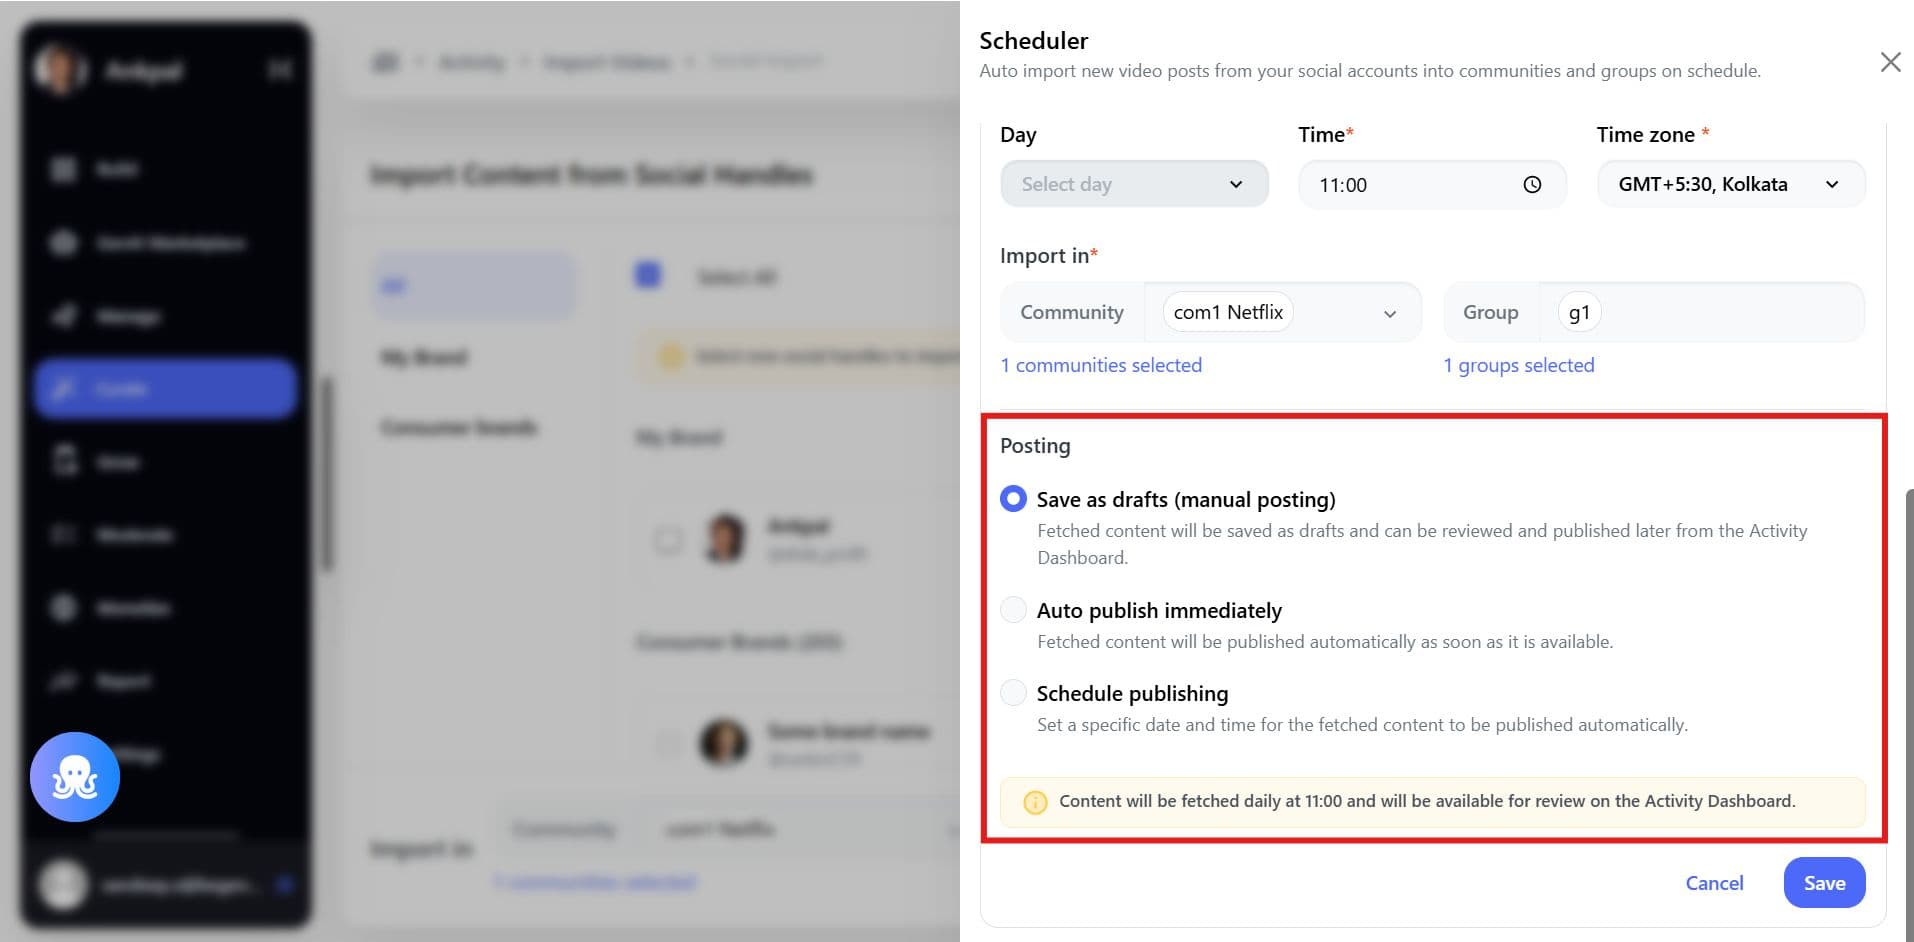
1.Save as Draft (Manual Posting)
- Import frequency (Hourly) : Content will be fetched every {X} hours, starting at {fetch_time}, and will be available for review in the Activity Dashboard
- Import frequency (Daily) : Content will be fetched daily at {fetch_time} and will be available for review on the Activity Dashboard.
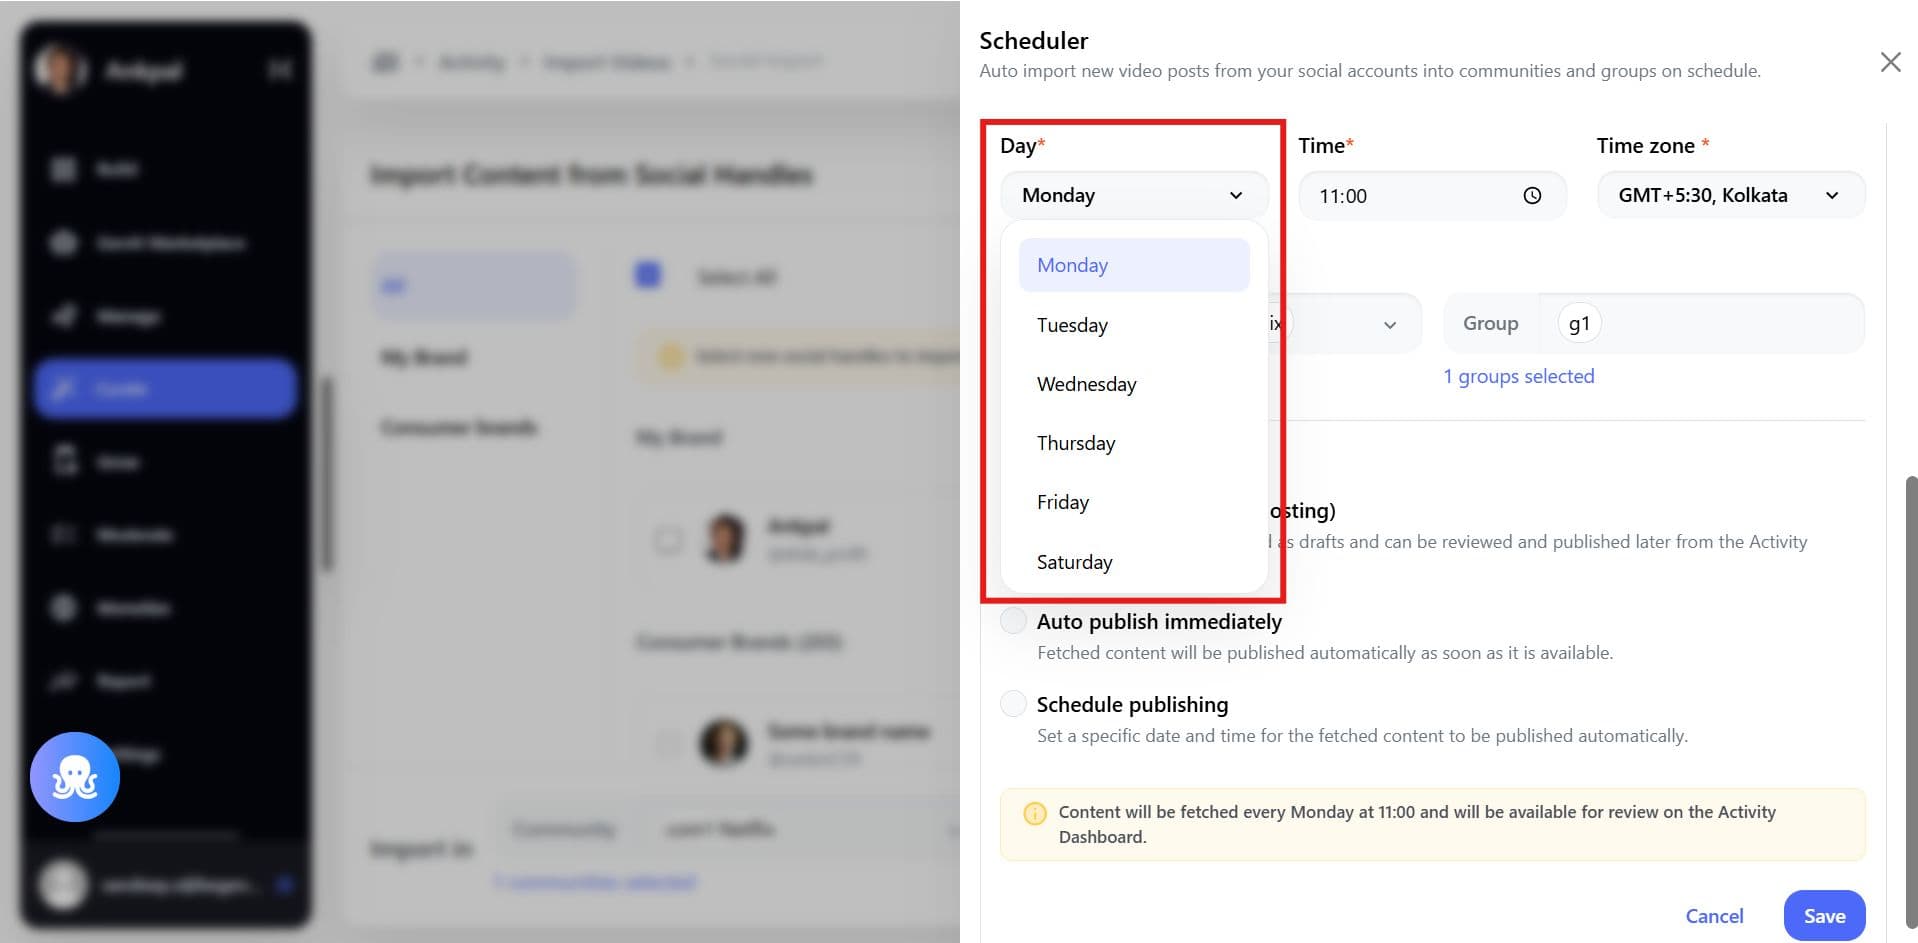
- Import frequency (Weekly) : Content will be fetched every {fetch_day} at {fetch_time} and will be available for review on the Activity Dashboard.
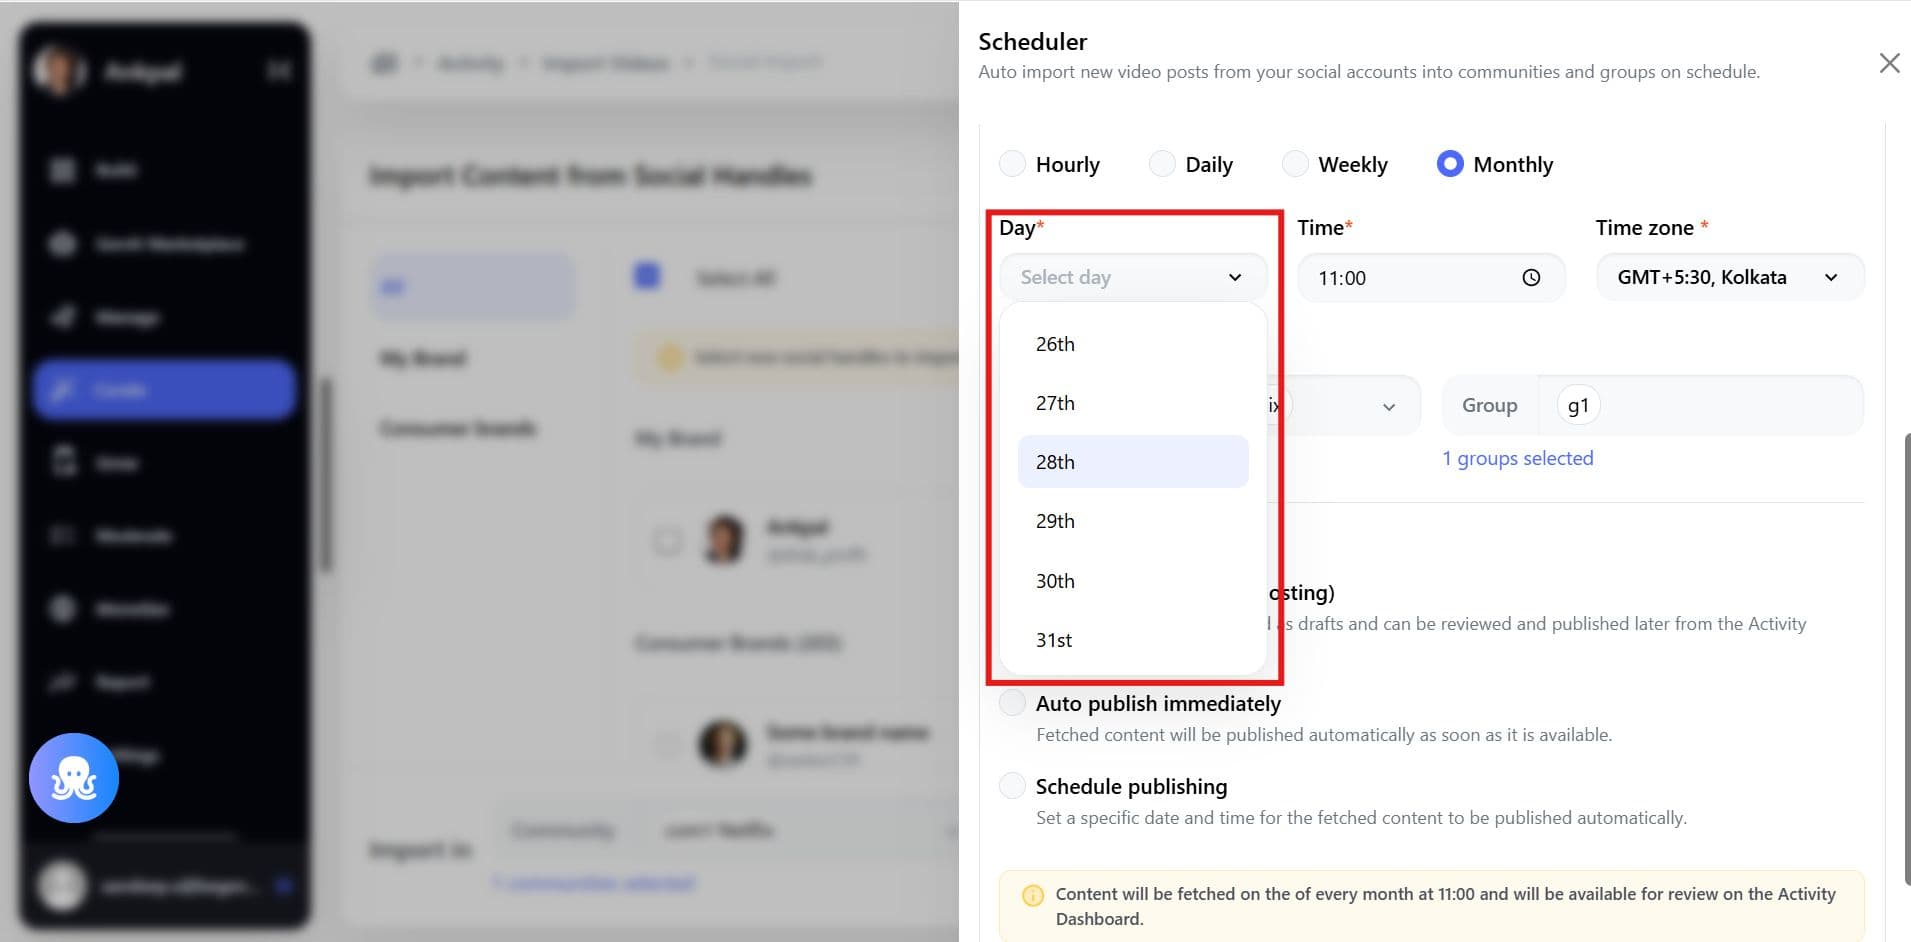
- Import frequency (Monthly) : Content will be fetched on the {fetch_date} of every month at {fetch_time} and will be available for review on the Activity Dashboard.
2. Auto Publish Immediately
- Import frequency (Hourly) : Content will be fetched every {X} hours, starting at {fetch_time} and published automatically once available.
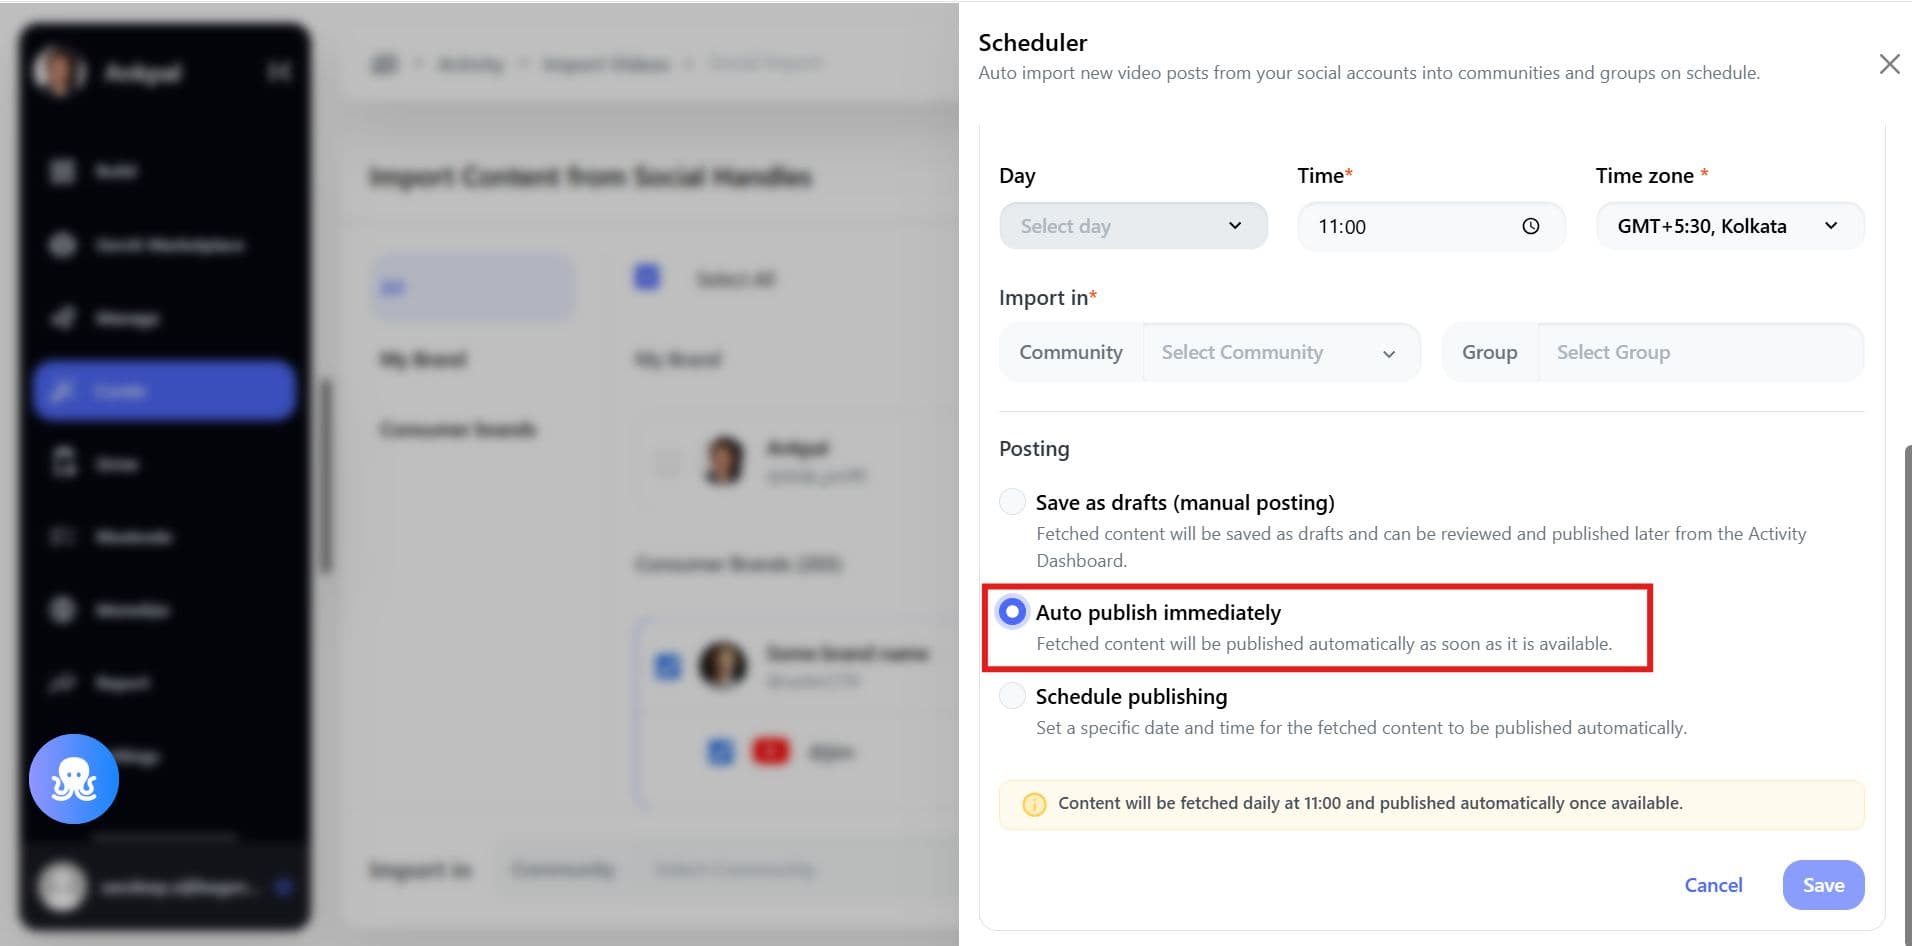
- Import frequency (Daily) : Content will be fetched daily at {fetch_time} and published automatically once available.
- Import frequency (Weekly) : Content will be fetched every {fetch_day} at {fetch_time} and published automatically once available.
- Import frequency (Monthly) : Content will be fetched on the {fetch_date} of every month at {fetch_time} and published automatically once available.
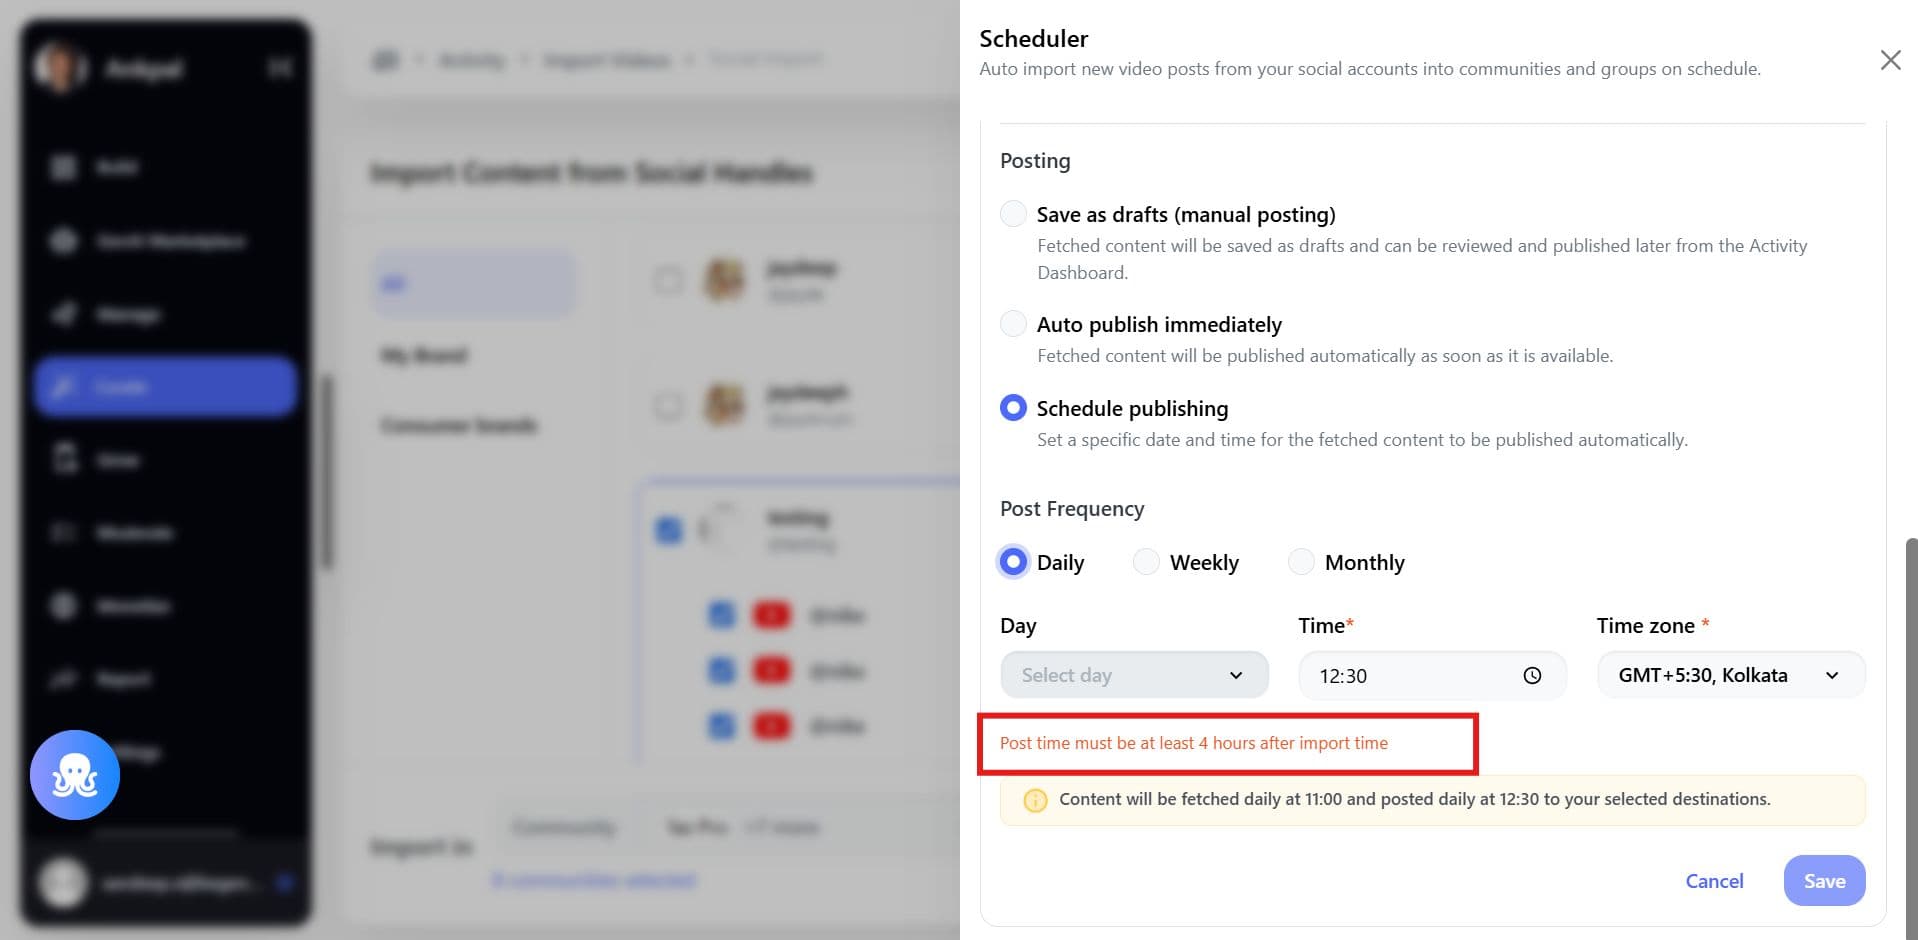
3. Schedule Publishing
- Import (Daily) & Posting (Daily) : Content will be fetched daily at {fetch_time} and posted daily at {post_time} to your selected destinations.
- Import (Daily) & Posting (Weekly) : Content will be fetched daily at {fetch_time} and posted every {post_day} at {post_time} to your selected destinations.
- Import (Daily) & Posting (Monthly) : Content will be fetched daily at {fetch_time} and posted on the {post_date} of every month at {post_time} to your selected destinations.
- Import (Weekly) & Posting (Weekly) : Content will be fetched every {fetch_day} at {fetch_time} and posted every {post_day} at {post_time} to your selected destinations.
- Import (Weekly) & Posting (Monthly) : Content will be fetched every {fetch_day} at {fetch_time} and posted on the {post_date} of every month at {post_time} to your selected destinations.
- Import (Monthly) & Posting (Monthly) : Content will be fetched on the {fetch_date} of every month at {fetch_time} and posted on the {post_date} of every month at {post_time} to your selected destinations.
When to Use Each Mode
| Use Case | Recommended Mode |
|---|---|
| Full manual control | Save as Draft |
| High trust automation | Auto Publish |
| Planned distribution cadence | Scheduled Publishing |
How to Create a Scheduler
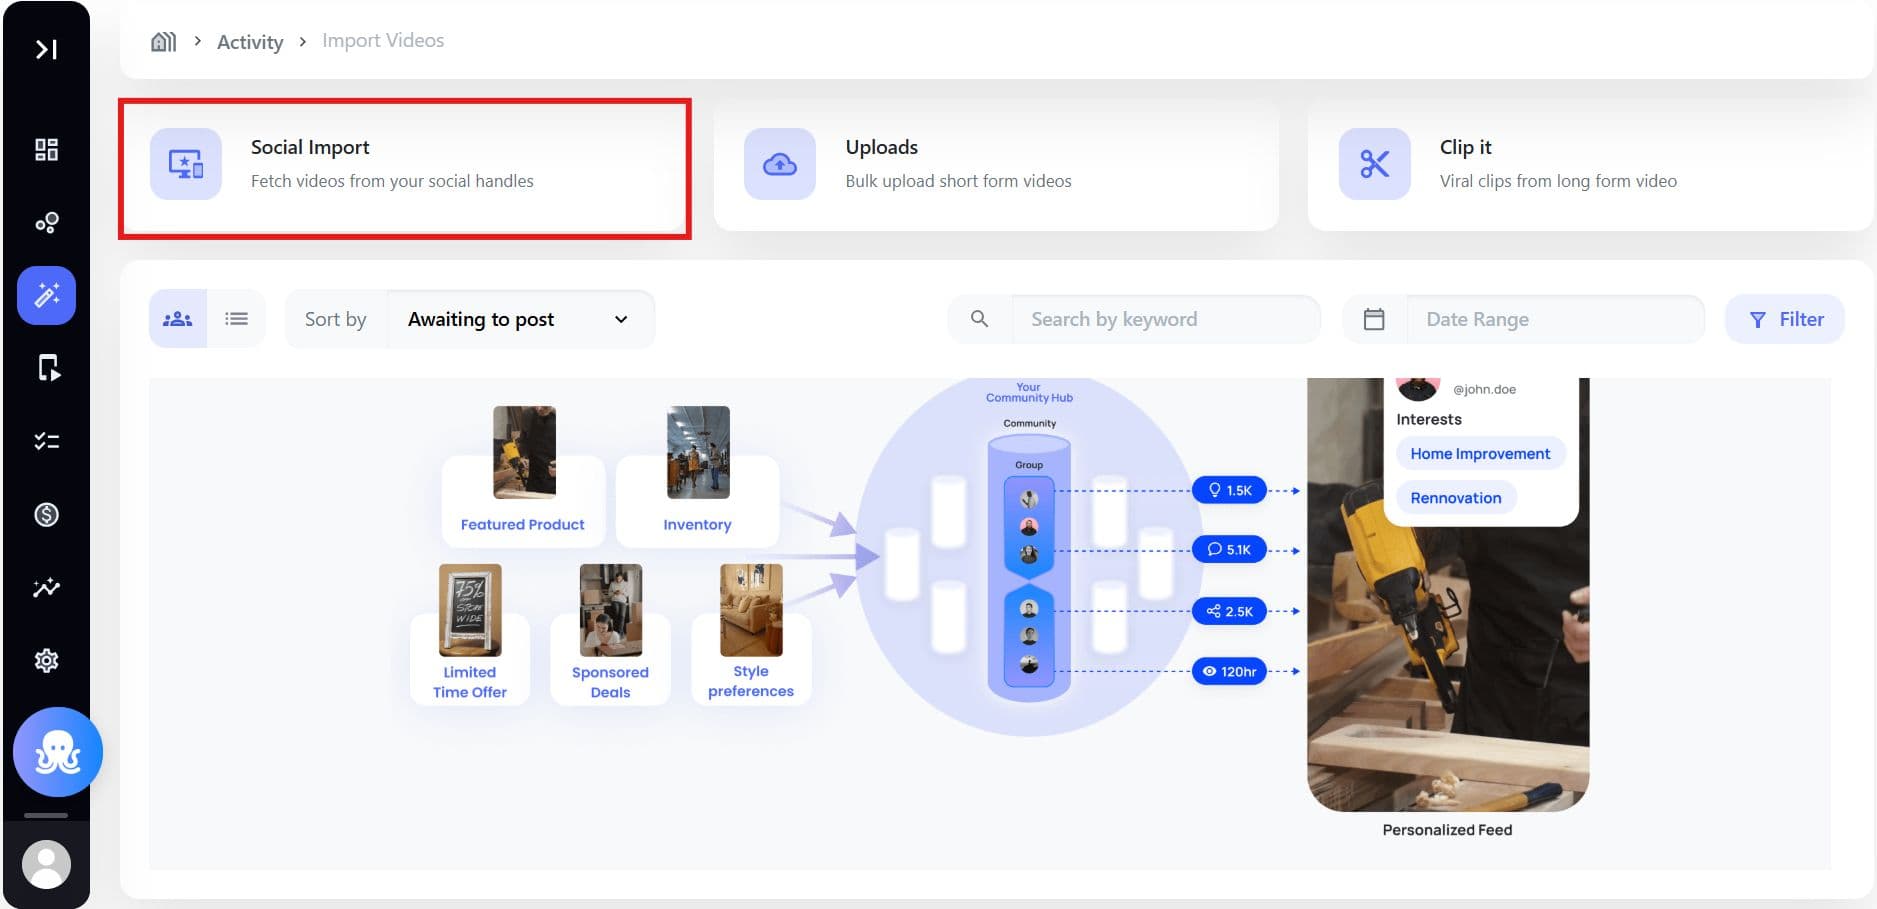
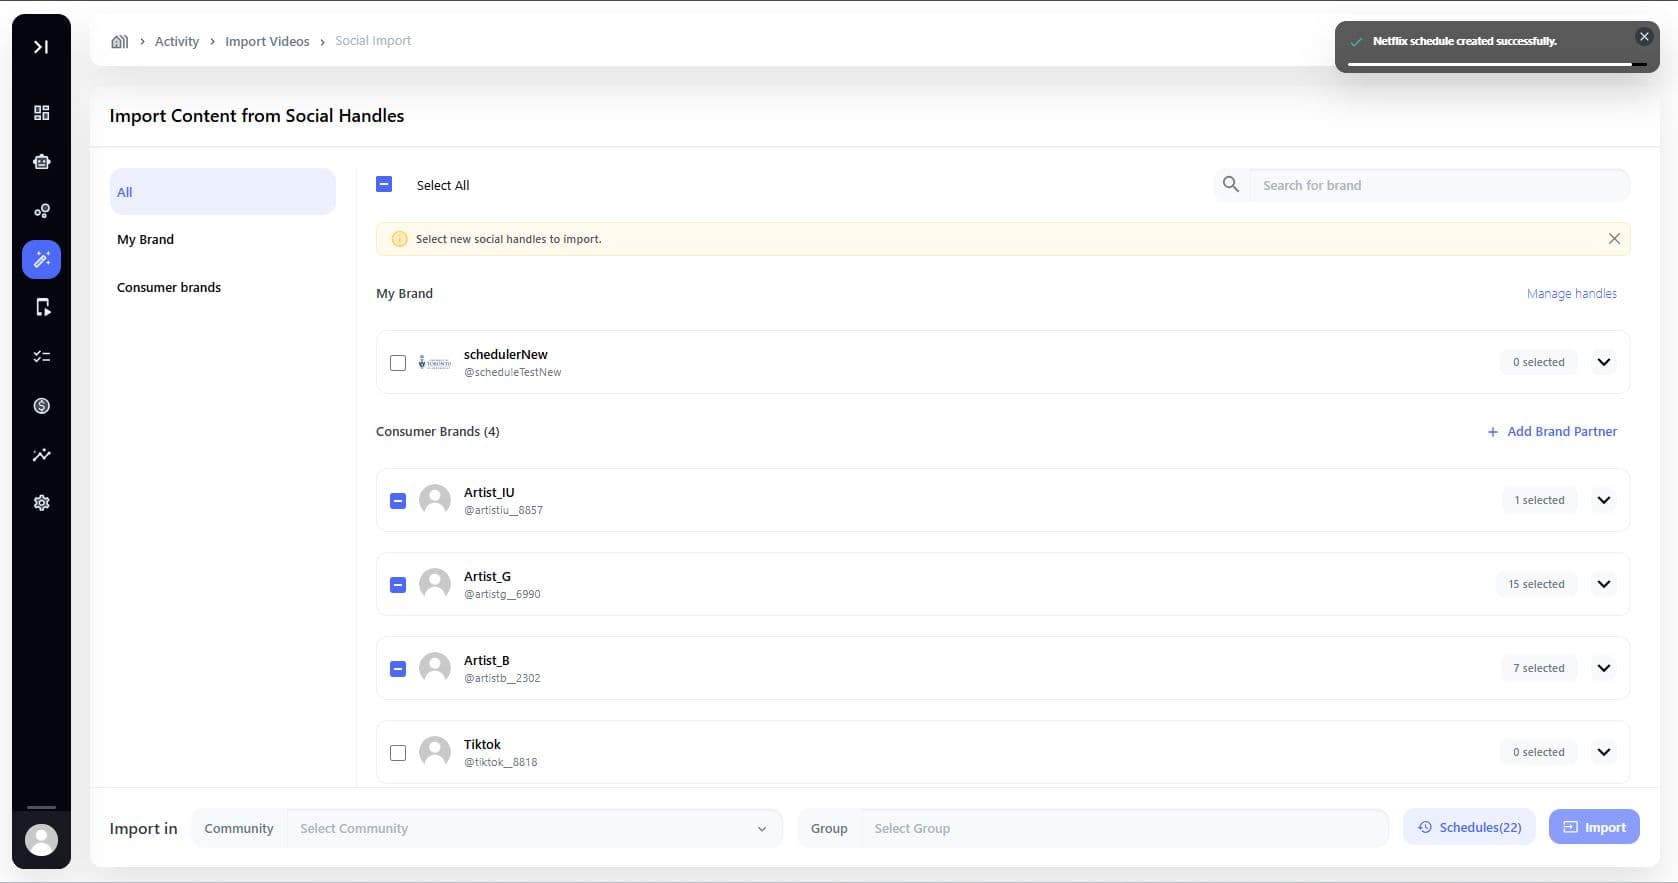
Step 1: Navigate to Social Import
Go to: Curate > Activity > New Post
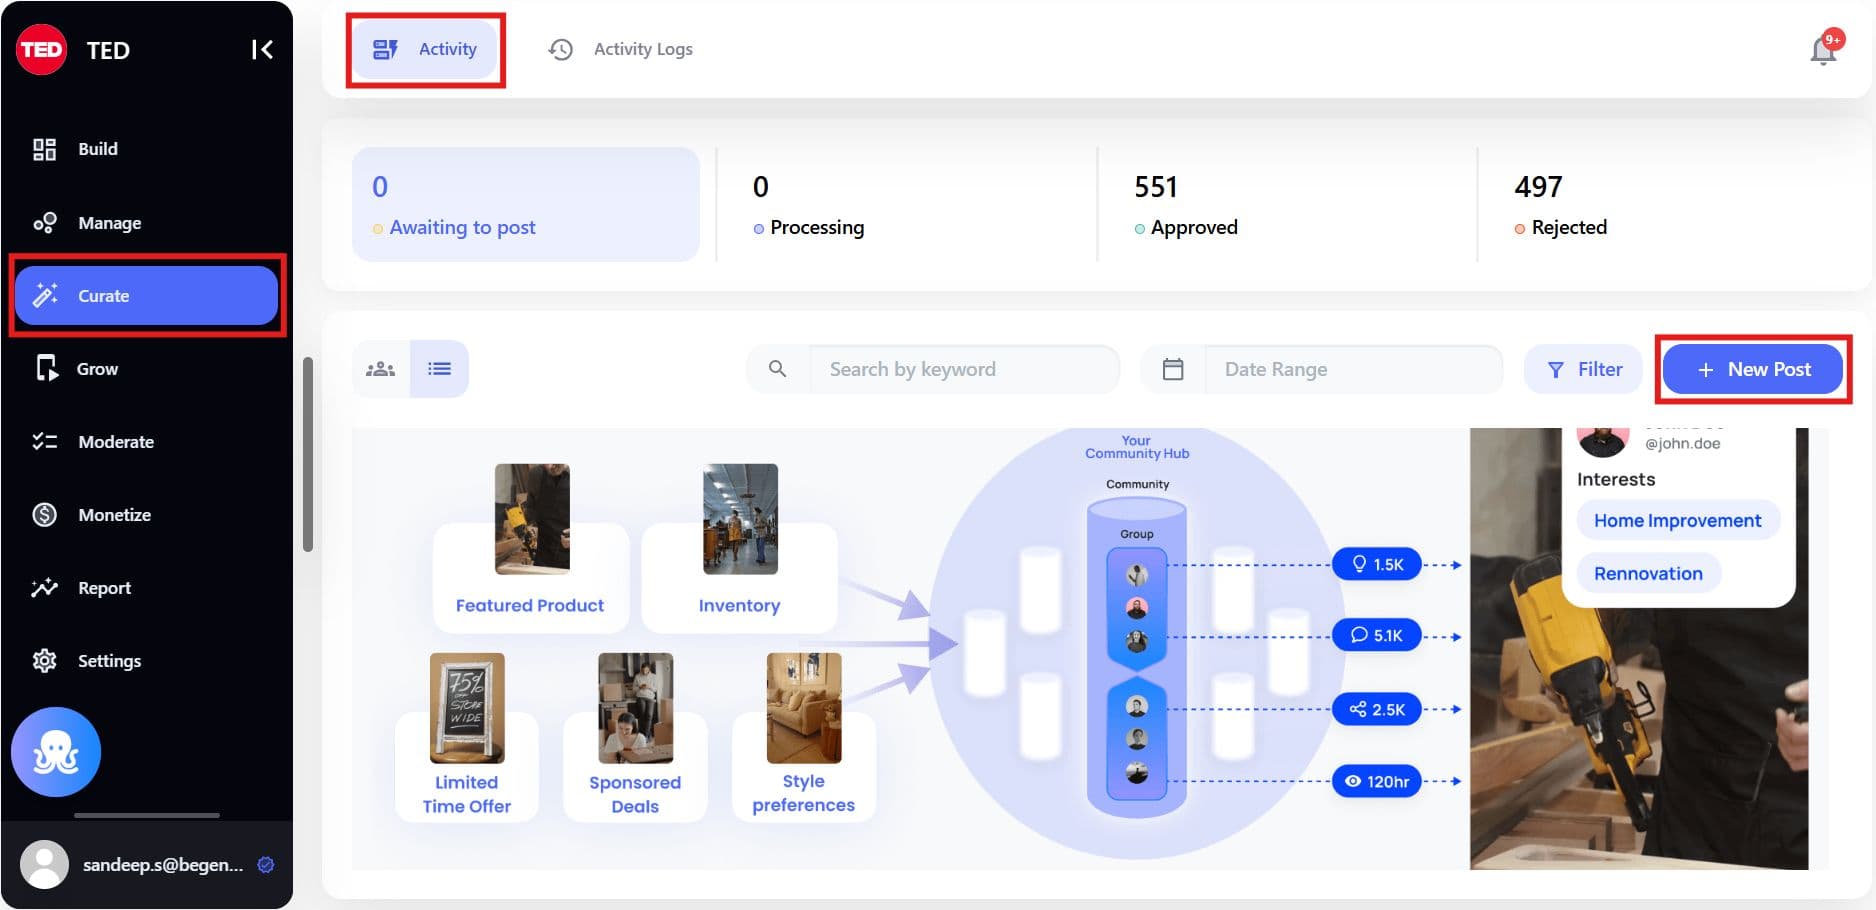
Click on Social Import option
Step 2: Select Brand - Social Handles, Communities & Groups
When you select a brand:
- Handle accordion expands automatically
- All handles are selected by default
- You may deselect handles
- Handles currently fetching content appear disabled
- CTA displays number of active schedulers (if applicable)
Validation rule: Selecting a Community or groups is optional; you can proceed to click on "Schedule" and schedule your content without making a selection.
Choose where imported content will go:
- Specific communities
- Specific groups
- Auto-curated communities/groups (AI-based mapping)
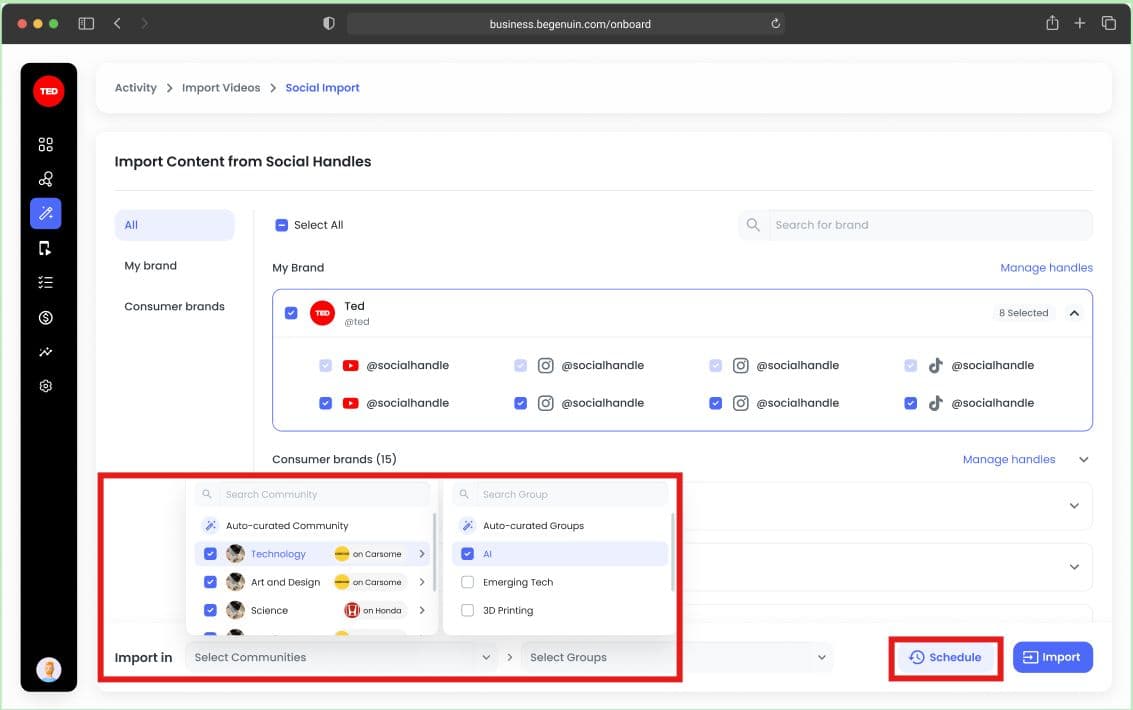
Step 3: Open Scheduler Panel
Click Schedule.
Default values:
- Import Frequency: Daily
- Time: 11:00 AM
- Posting Type: Save as Draft
- Time Zone: System default
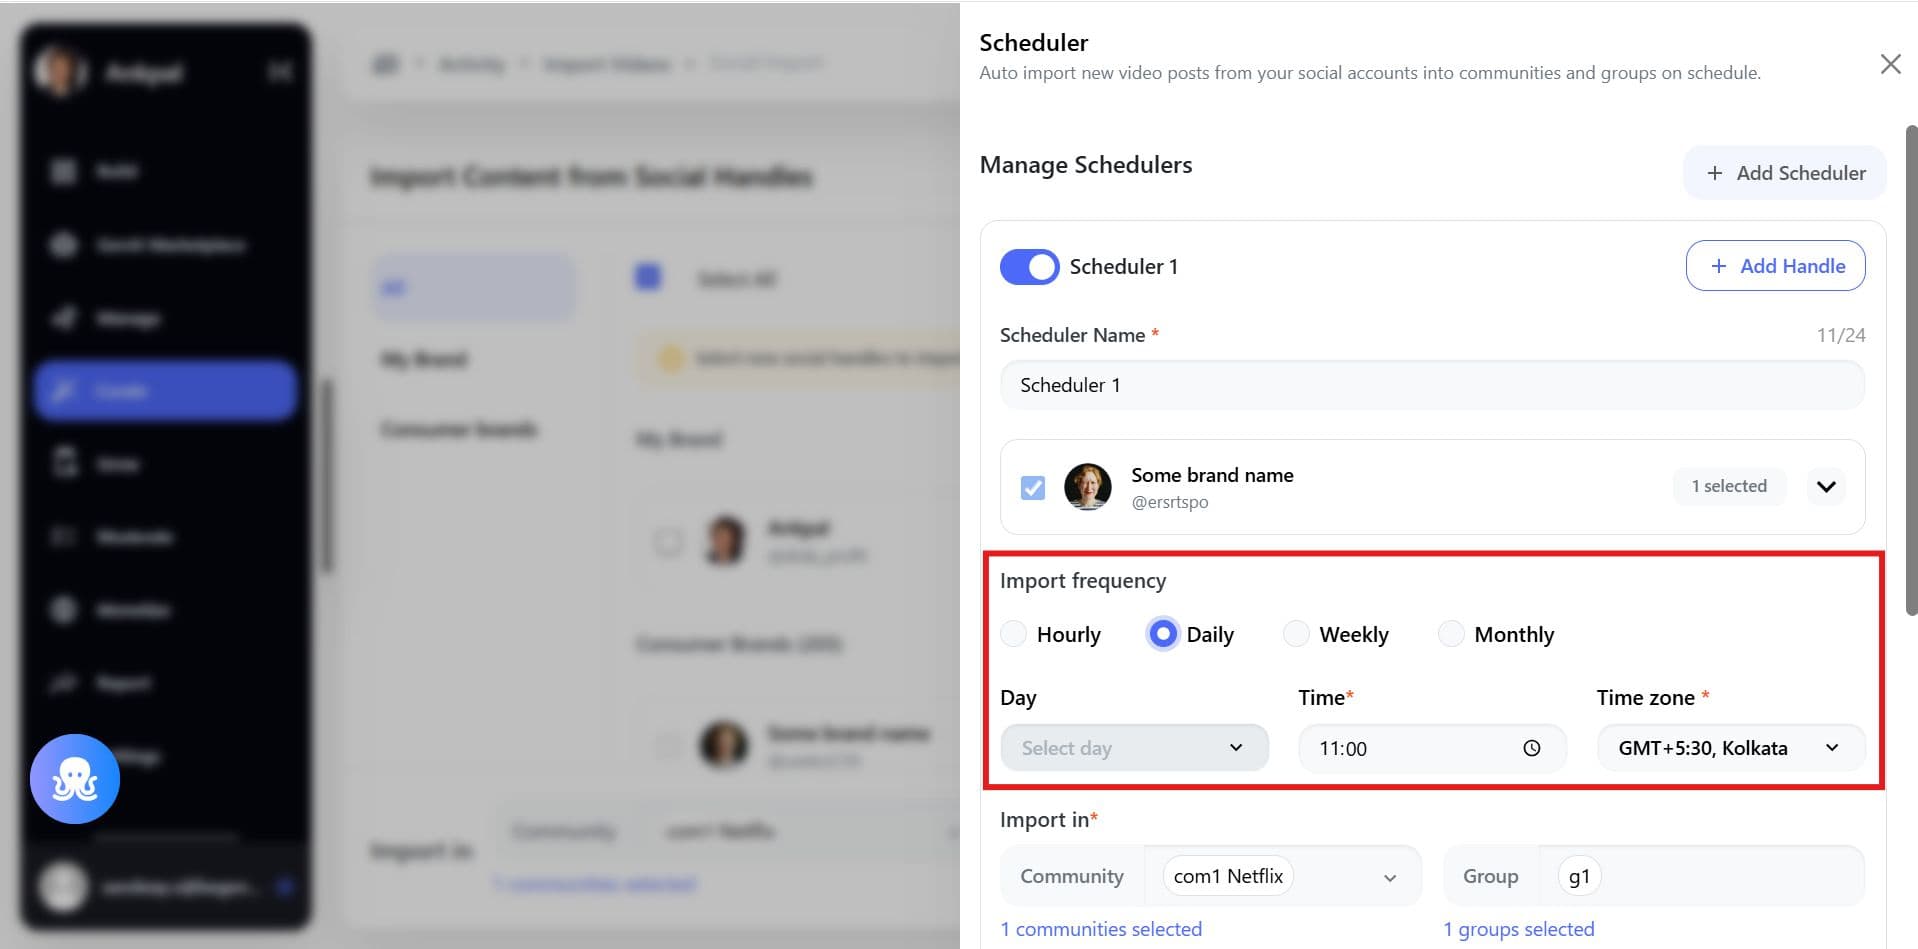
Scheduler Configuration Panel
Highlight:
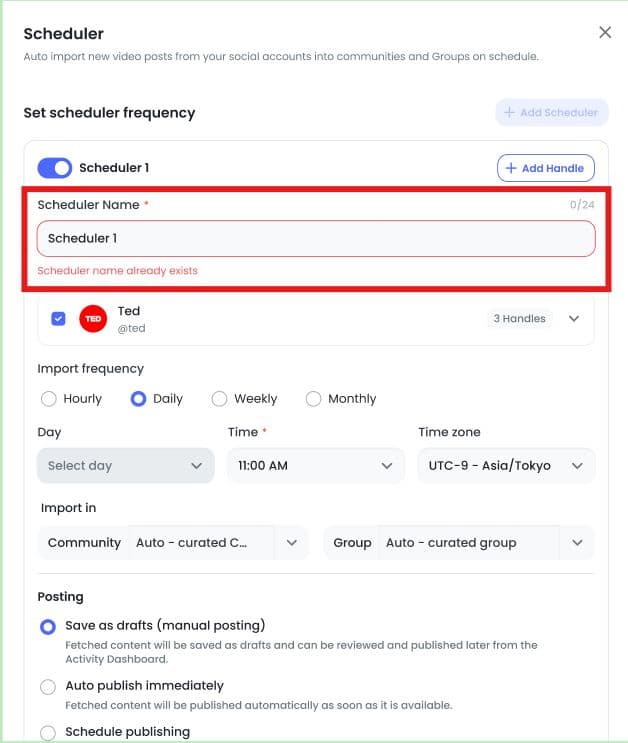
- Scheduler name field (editable)
- Import frequency dropdown
- Posting type
- Time zone
- Save button
Import Frequency Explained (Full Rules)
Hourly Import
Options:
- Repeat every (1/3/6/12 hours)
- Select start time
- Select time zone
Posting Types Available:
- Save as Draft
- Auto Publish
Note: Scheduled Publishing is NOT available for hourly import.
Daily Import
Select: Time & Time zone
4-Hour Buffer Rule
If using Scheduled Publishing: Posting time must be at least 4 hours after import time
Note: Time slots before buffers are disabled.
Weekly Import
Select: Day (Monday–Saturday), Time & Time zone
Rules:
- If posting on same day: 4-hour buffer enforced
- If posting on different day: No buffer restriction
Dependency rule: If import frequency is Weekly, posting frequency cannot be Daily
Monthly Import
Select: Date (1–31), Time & Time zone
Edge Case: Date Does Not Exist
If you select 31st:
- February - Runs on 28th/29th
- April - Runs on 30th
The system automatically adjusts to the last available date.
Same-Date Rule
If publishing on same date: 4-hour buffer applies
Posting Type Explained
Save as Draft (Default)
Note: Scheduler Name should not be repeated.
Auto Publish Immediately
Import and publish happen in parallel.
Once content is fetched:
- It is processed
- It is published automatically
No manual review.
Best for:
- High-volume trusted accounts
- Mature content operations
Scheduled Publishing
Import occurs first. Publishing follows a defined cadence.
Rules:
- Posting frequency depends on import frequency
- 4-hour buffer enforced when applicable
- Daily posting disabled if import Weekly
Saving the Scheduler
Click Save.
Validation checks:
- Community/group selection
- Time dependency rules
- Frequency compatibility
Success message: (Refer - Point 6)
Note: Changes apply only to future imports.
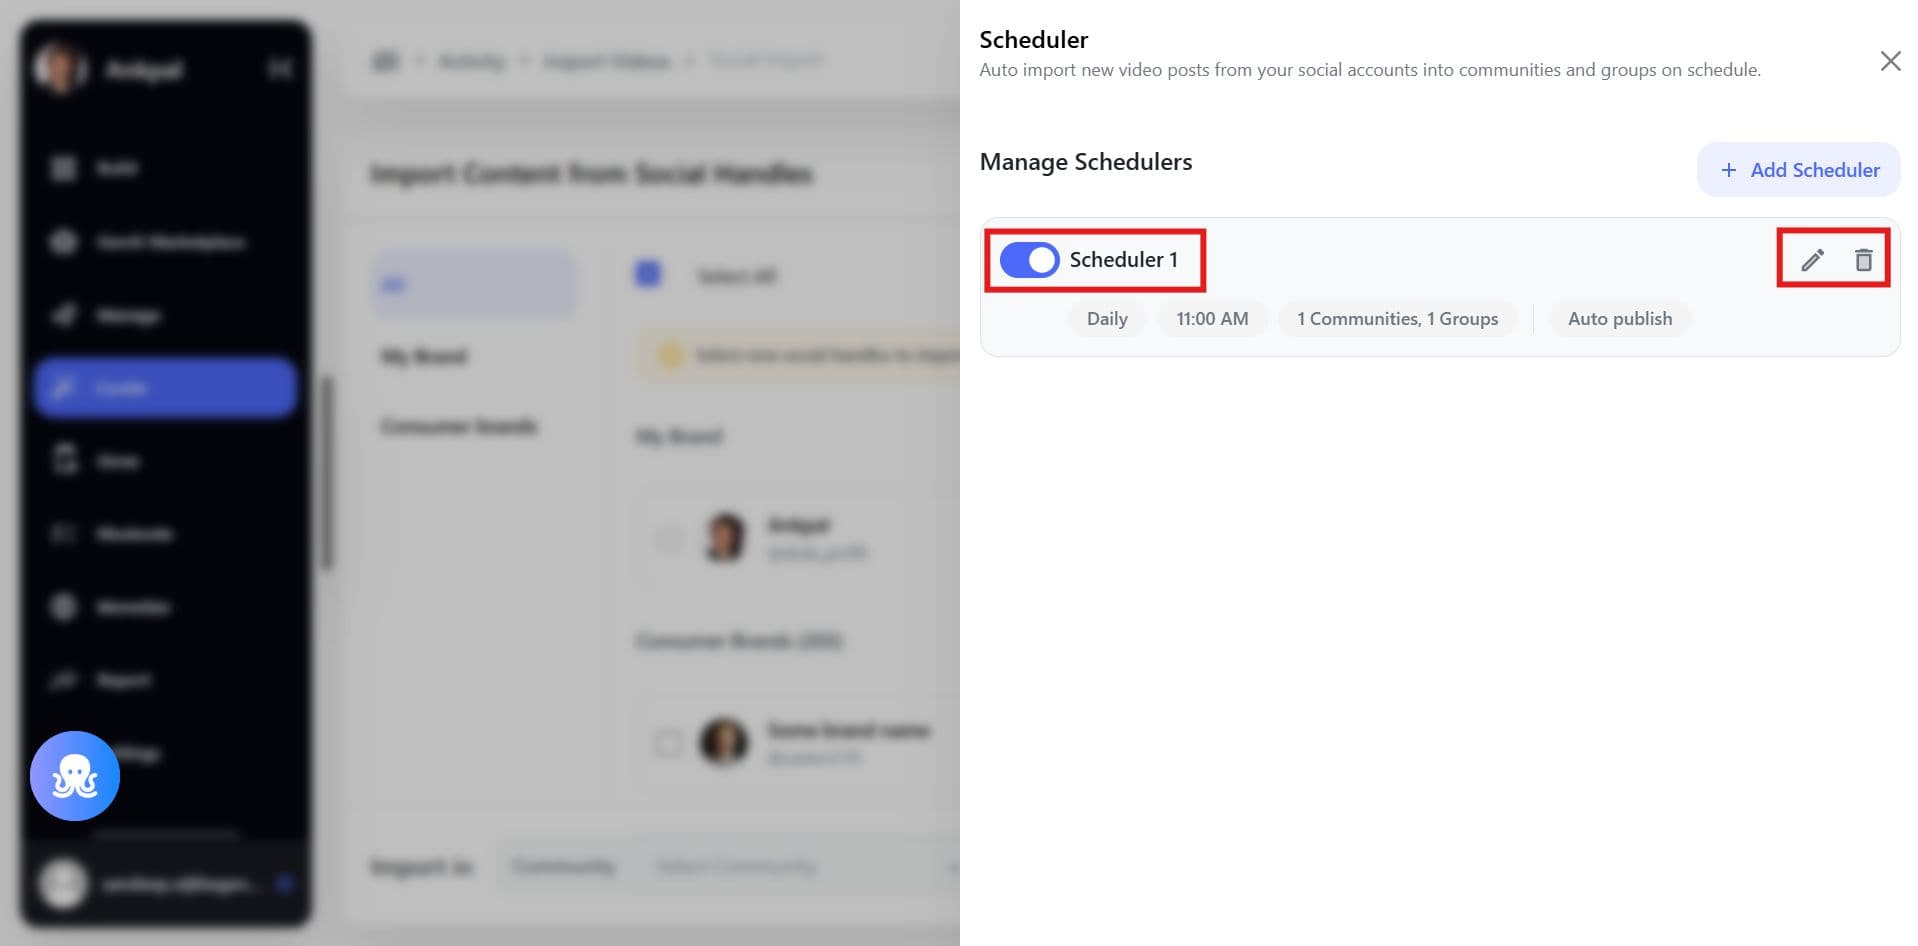
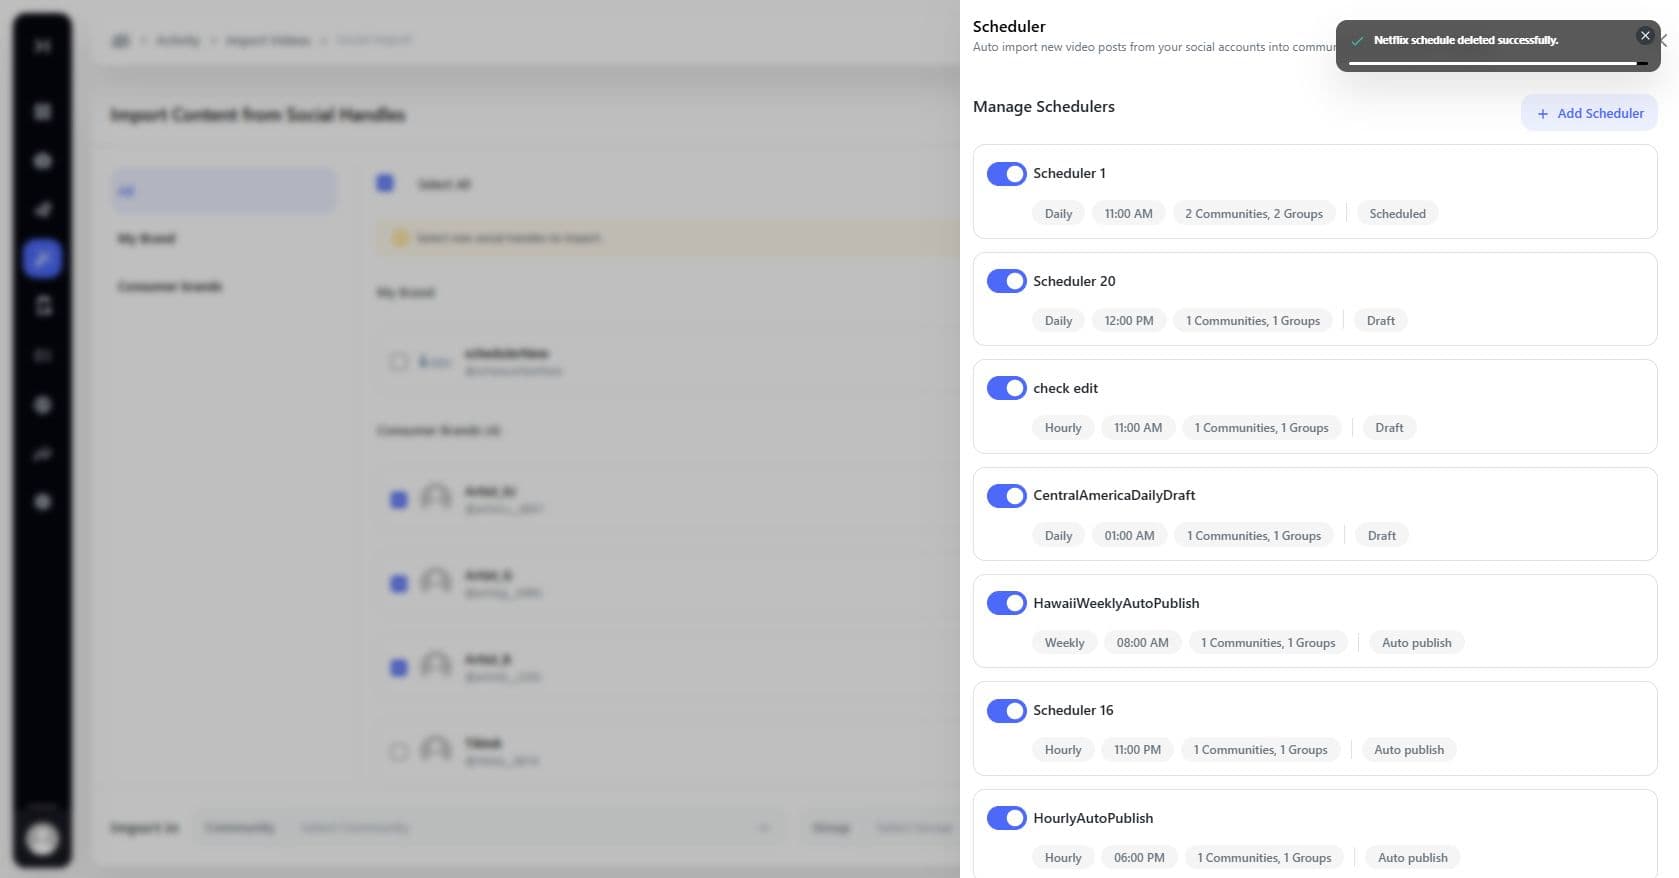
Managing Existing Schedulers
You can:
- Edit scheduler
- Delete scheduler
- Toggle ON/OFF (The timezone is selected for the schedule toggle.)
Hover over scheduler to access actions.
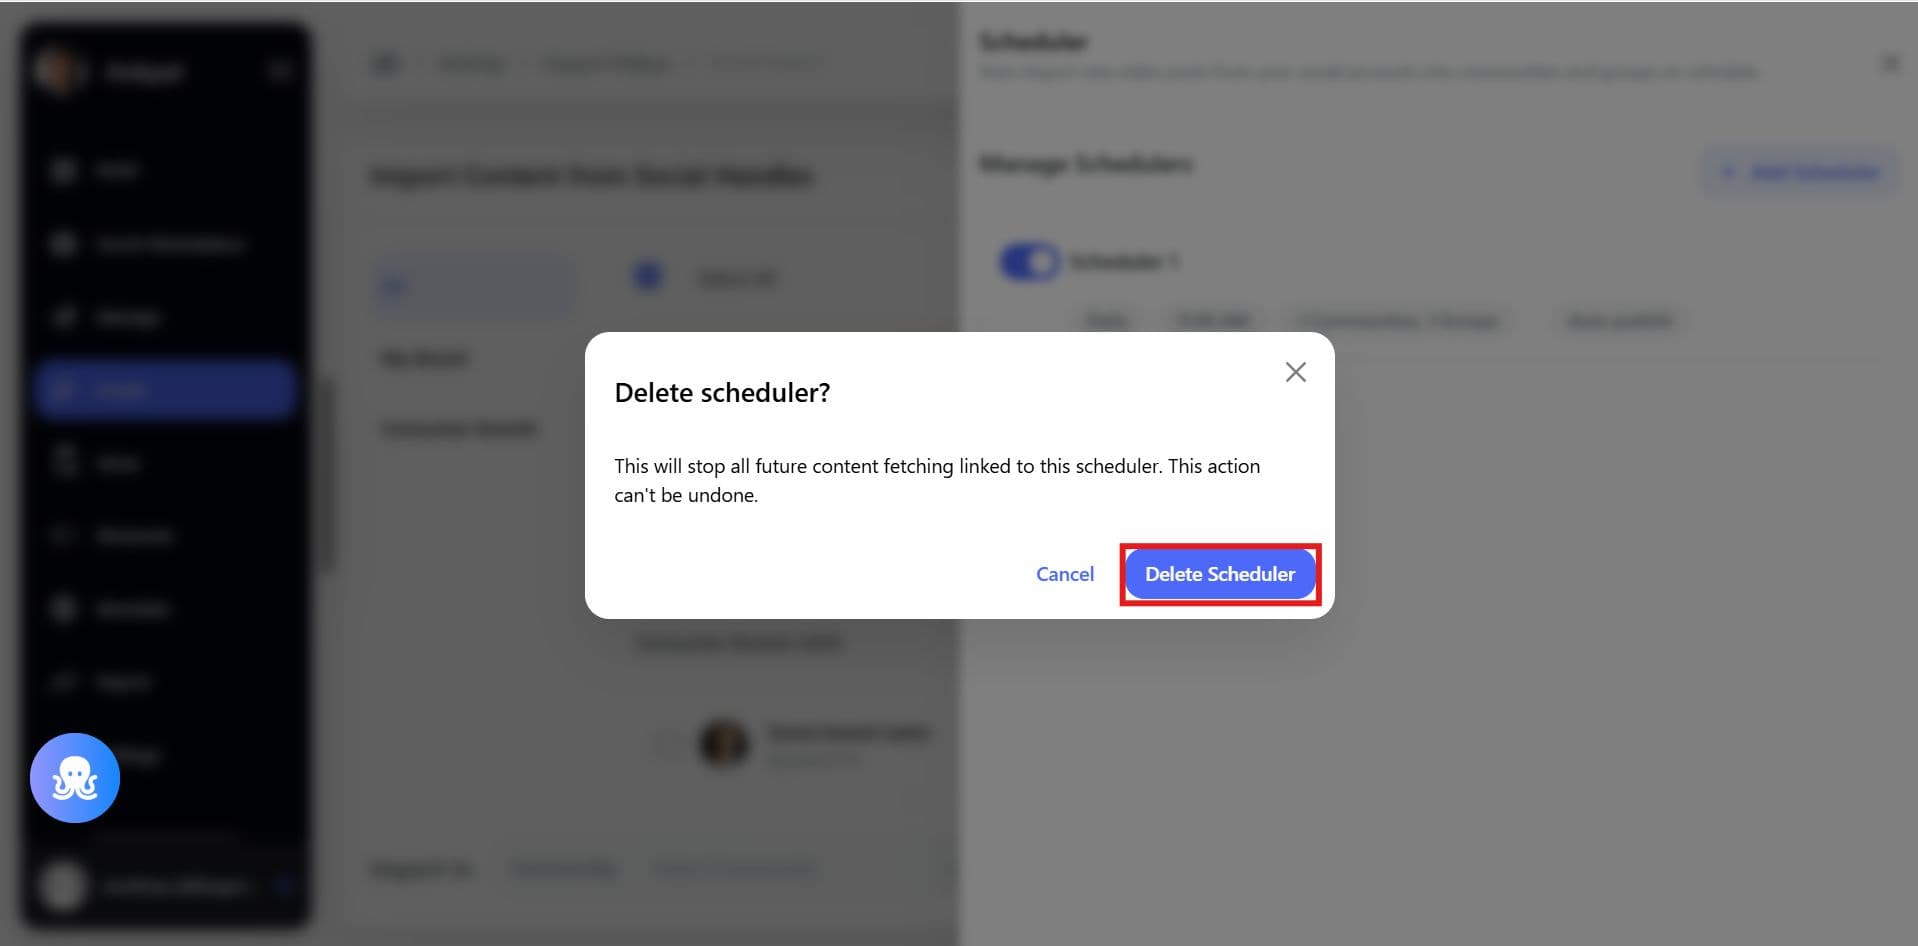
Cancel/Delete Confirmation Modal
Highlight:
- Warning message for Cancel
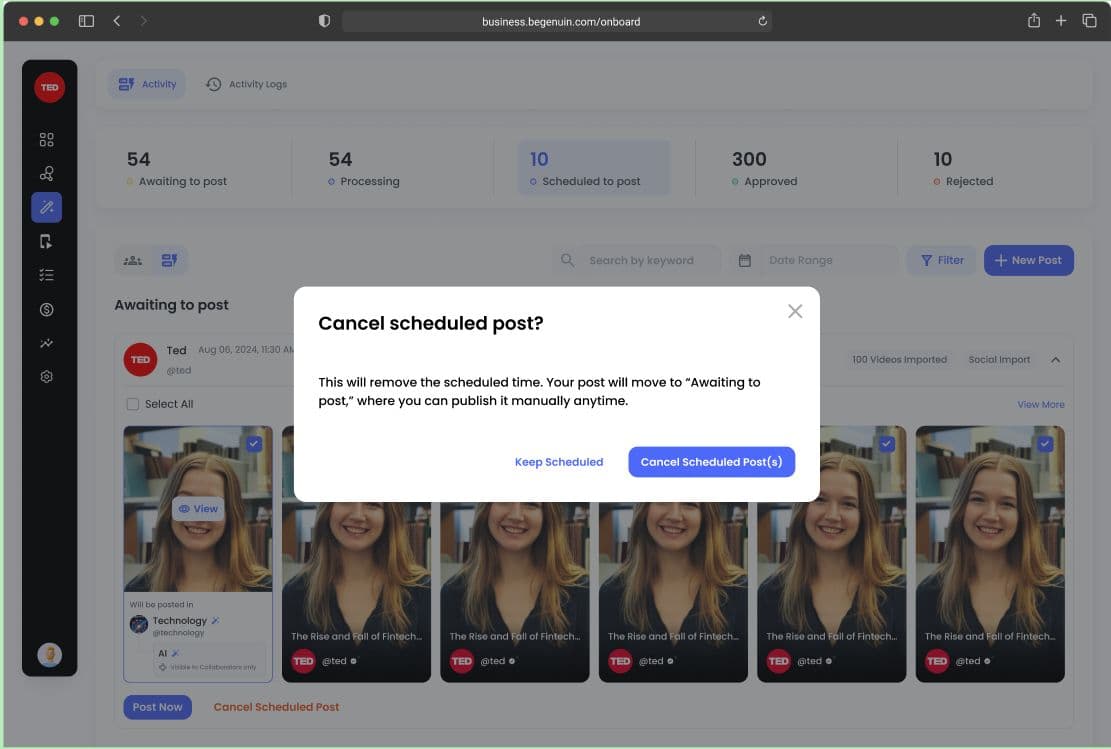
- Warning message for Delete
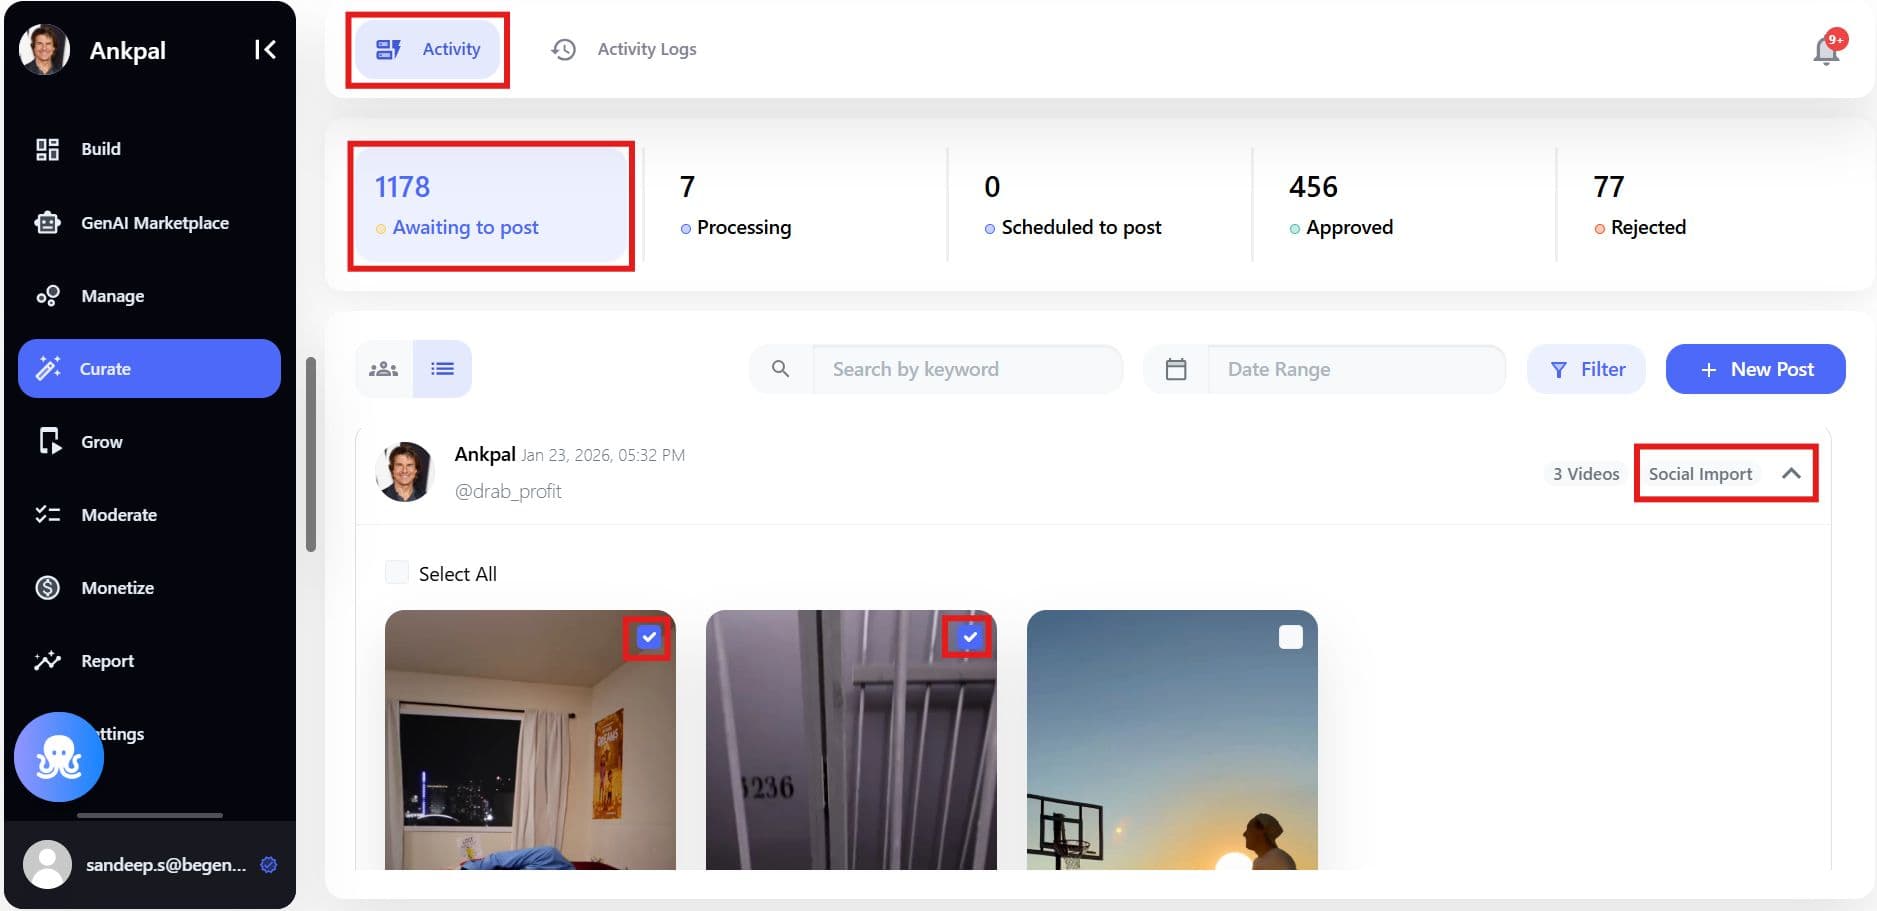
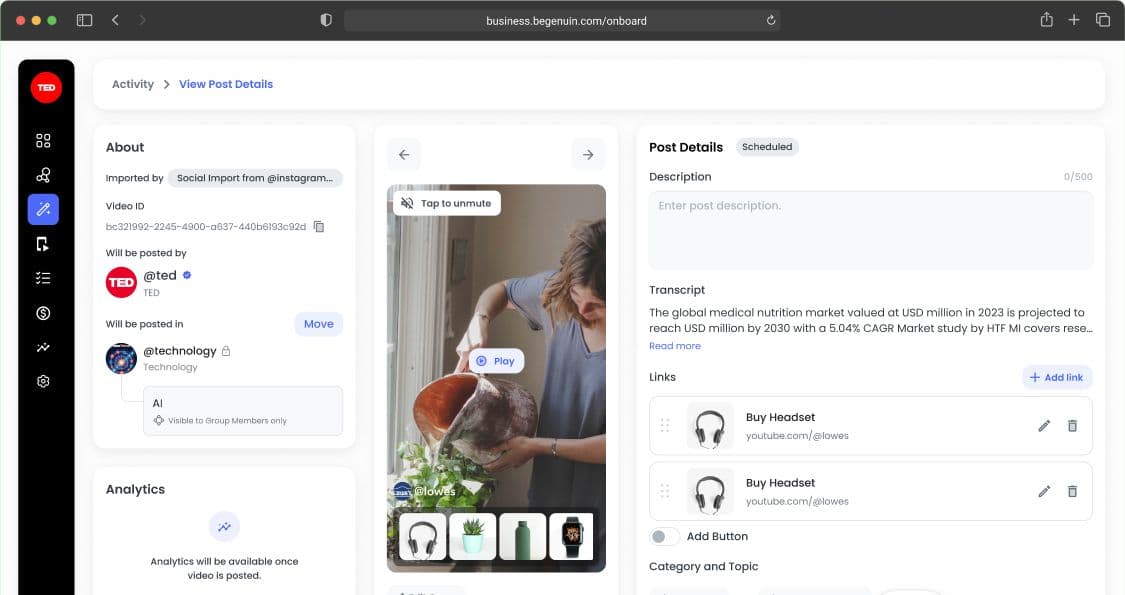
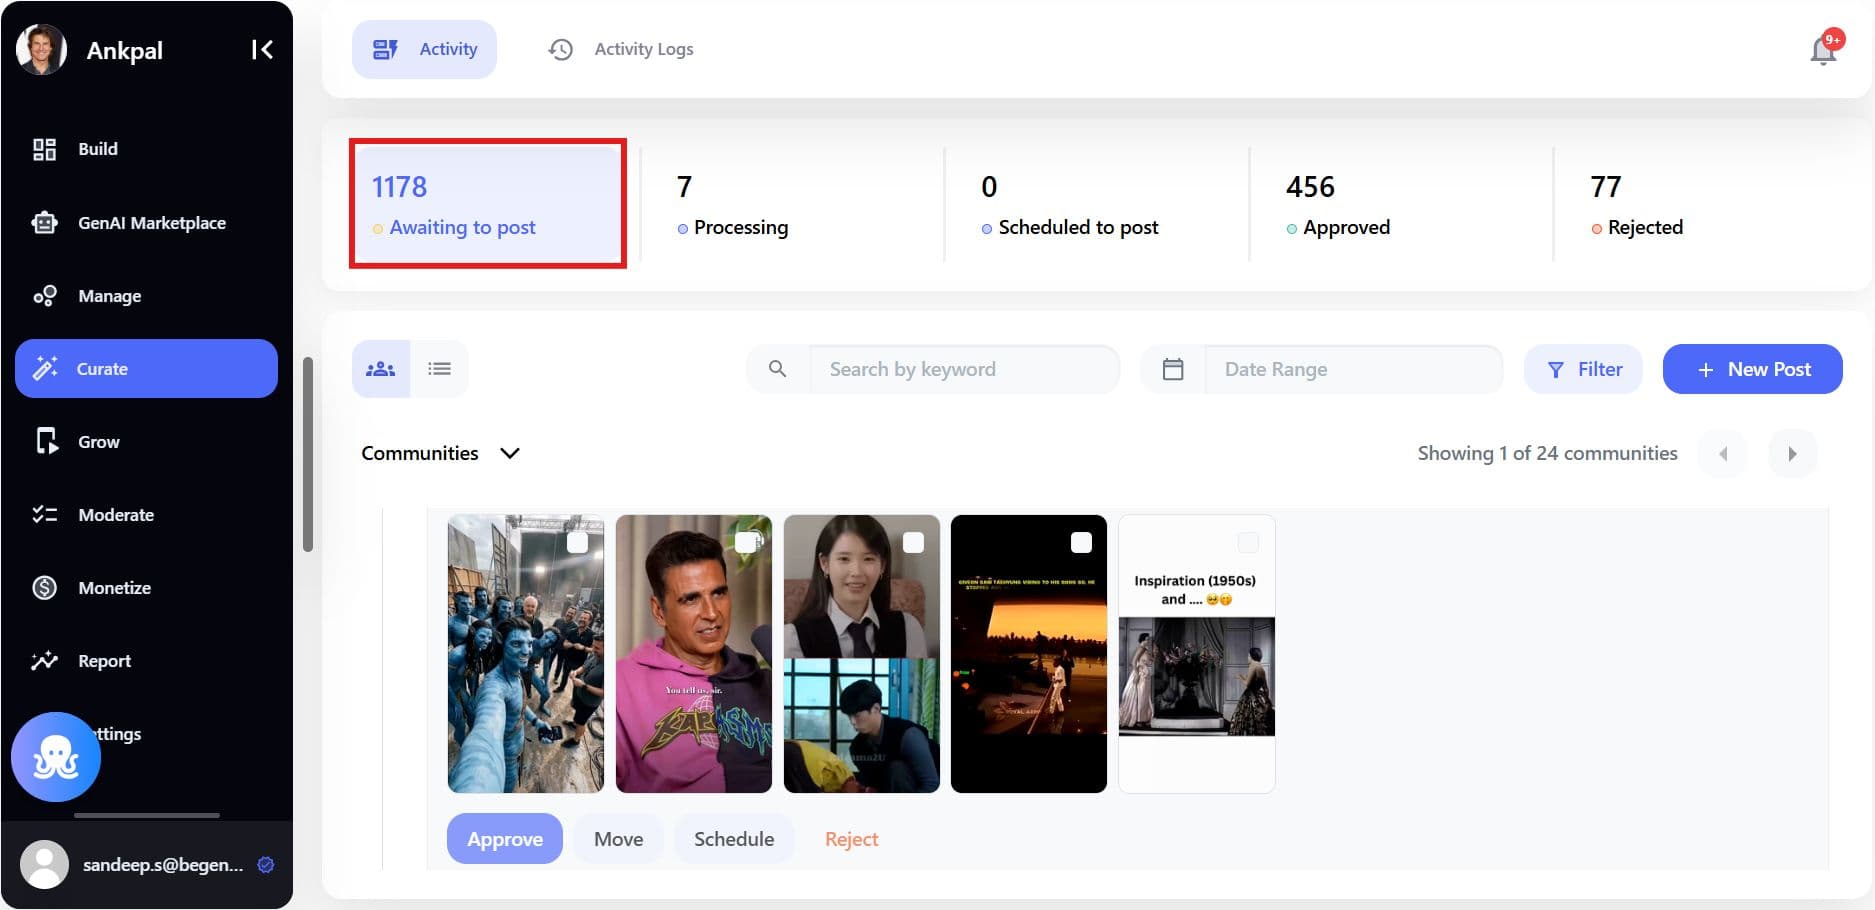
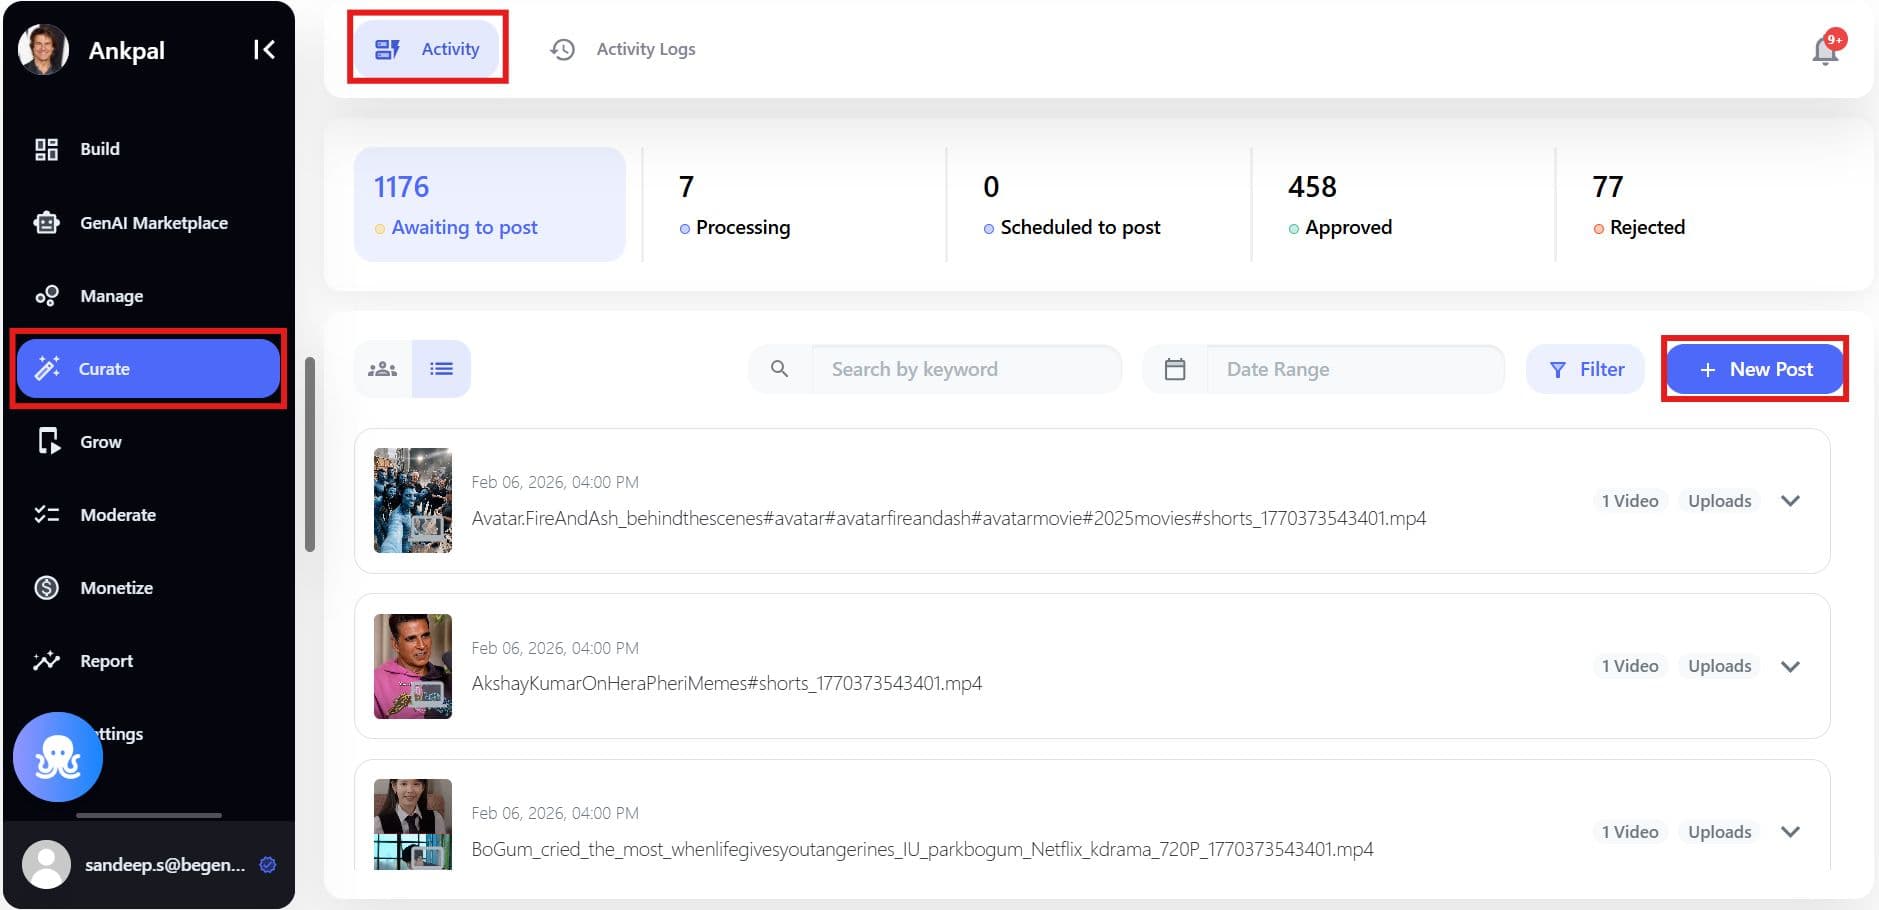
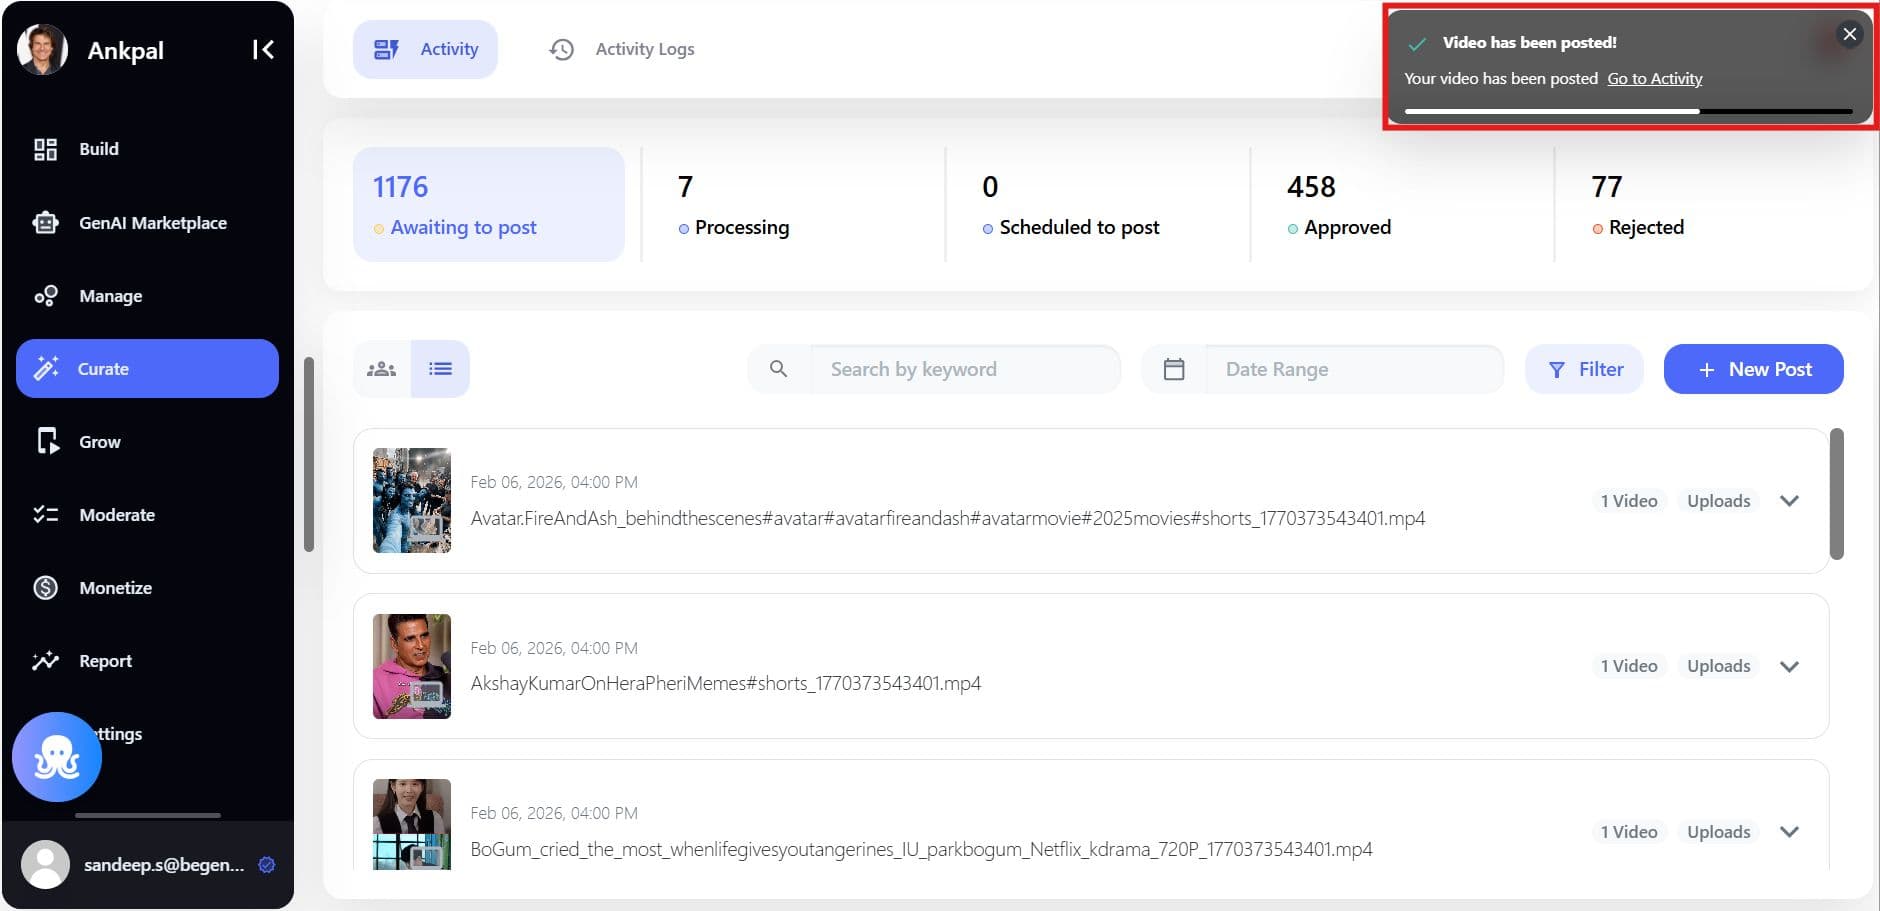
Awaiting to Post
Posts from:
- Social Import
- Upload
- Clip It
Appear under: Awaiting to Post
Posts show:
- Scheduled tag (if scheduled)
- Multi-select checkbox
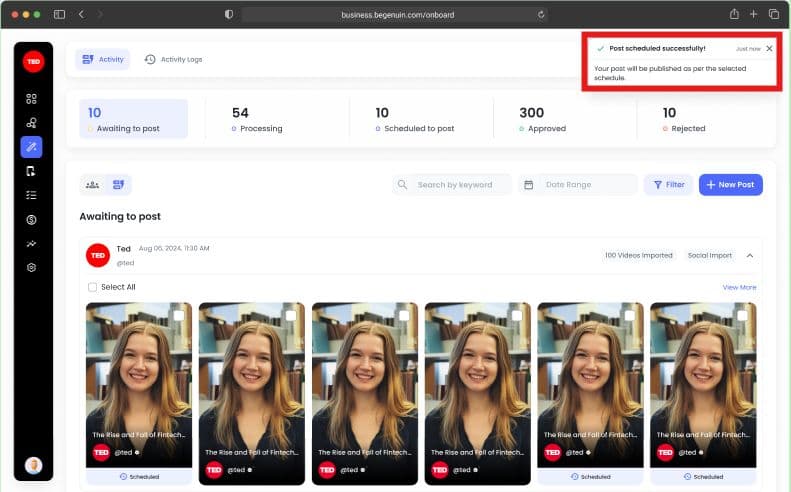
Scheduling Individual Posts
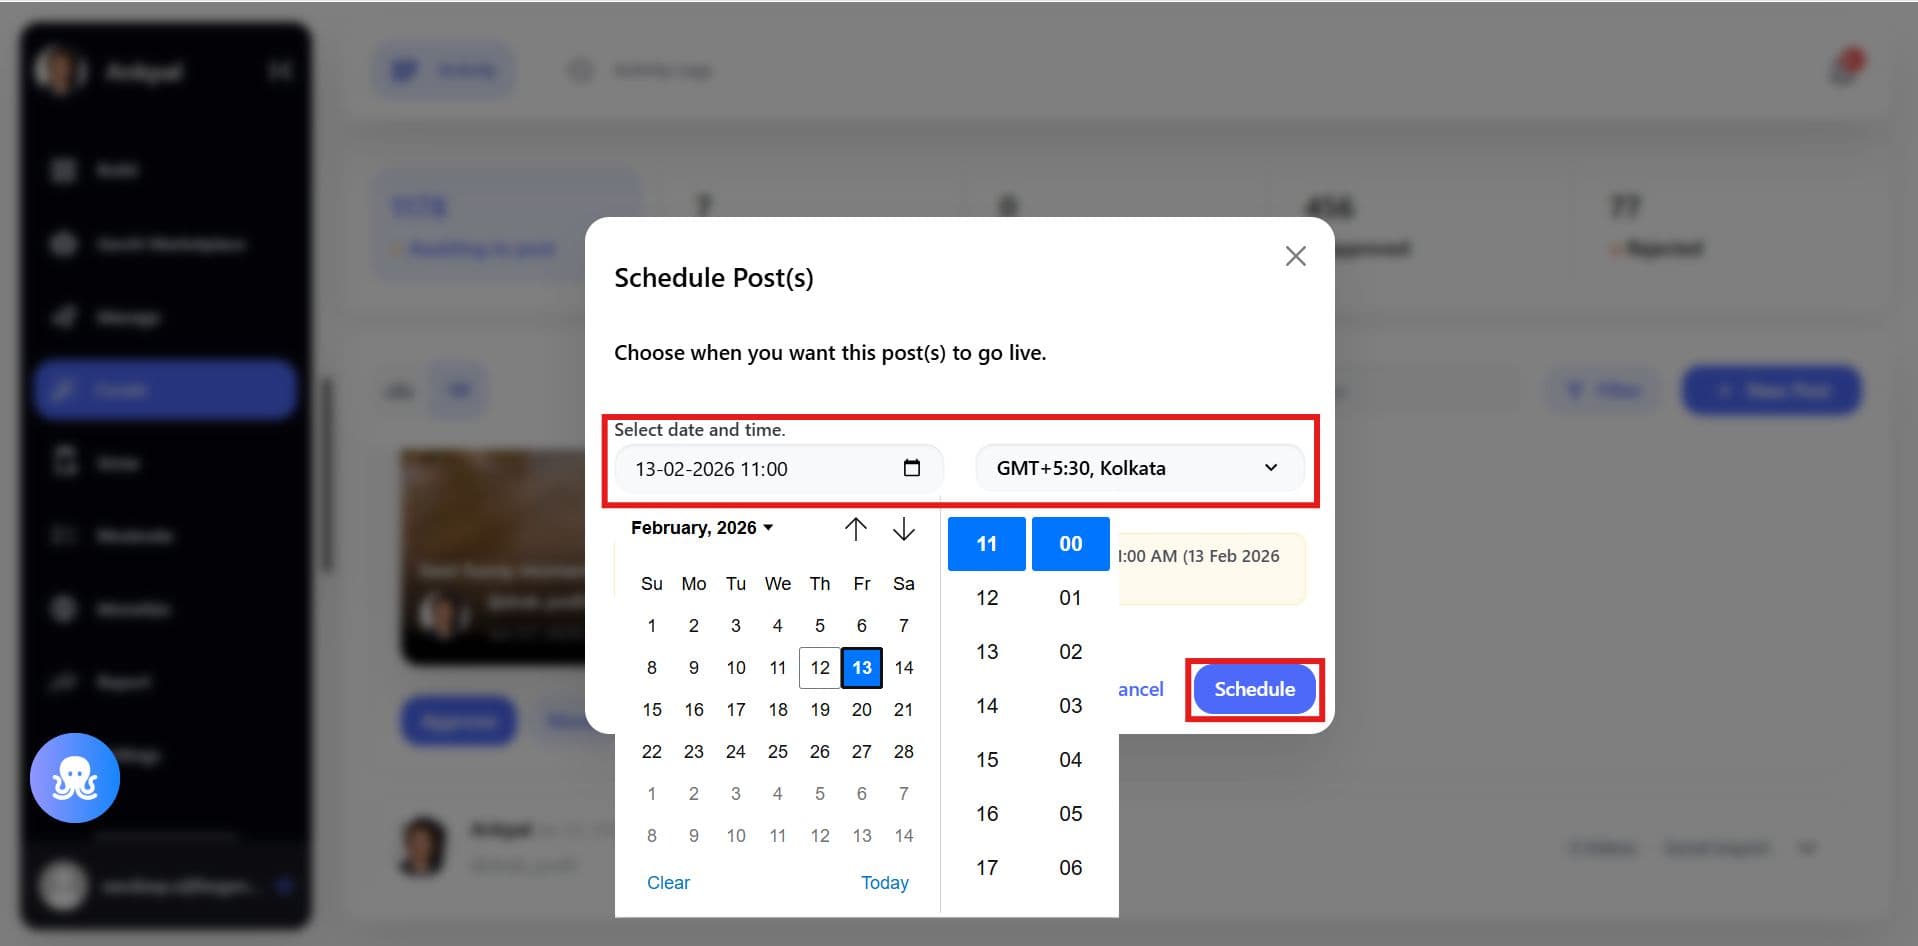
Select post(s) > Click Schedule (Refer: Point 6)
Choose:
- Date
- Time
- Time zone
System rules:
- Save Button is disabled
- 5 minutes gap margin
Success message: “Post scheduled successfully.”
Post Detail Page Controls
Open a scheduled post to:
- Post Now
- Cancel Scheduled Post
- Reschedule Post
Cancel returns post to Awaiting to Post.
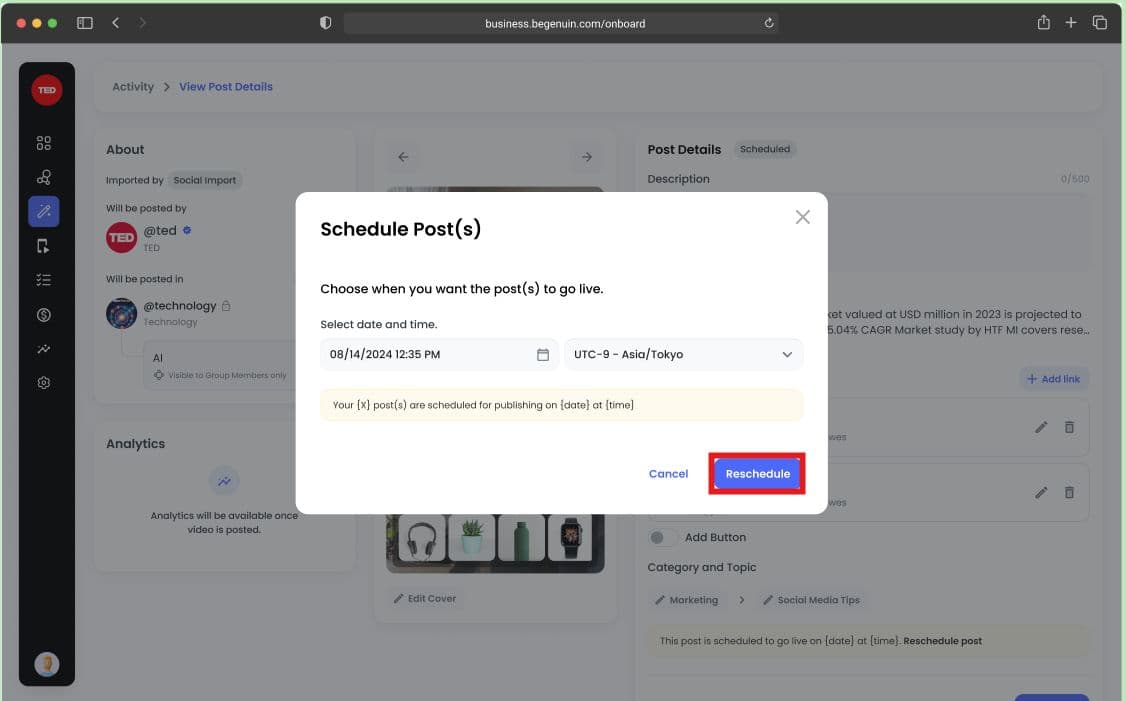
Rescheduled Sample Info Message: This post is scheduled to go live on {Local Date} at {Local Time} ({TZ Date}, {TZ Time}, {TZ Name})
Scenario:
- Post Rescheduled Successfully: Your post will be published as per the selected schedule.
- Failed to Rescheduled Post
Imported posts appear under: Awaiting to Post
No automatic publishing occurs.
Best for:
- High-governance environments
- Manual review workflows
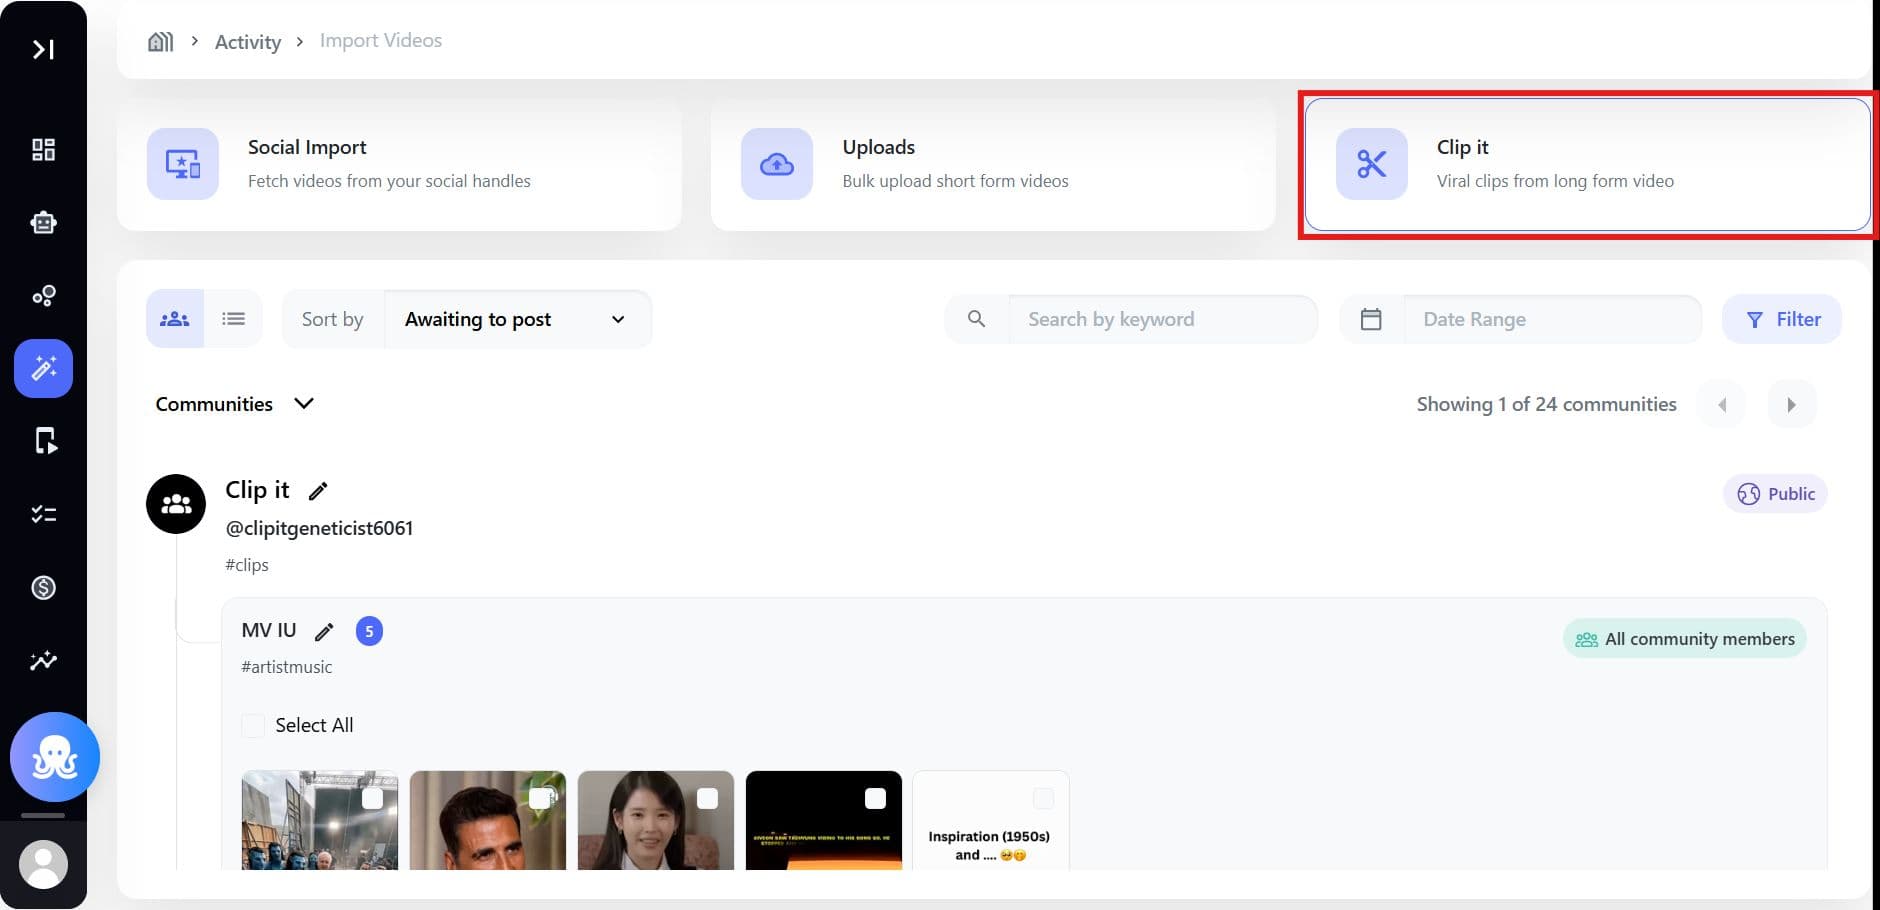
Schedule / Auto Publish via Clip It
Go to: Curate > Activity > New Post
Click on the Clip It button.
To upload a video, the "Clip It" window will open.
You can either paste a video URL (for videos up to 60 minutes long) or select files from your computer, Google Drive, Dropbox, or S3 Bucket.
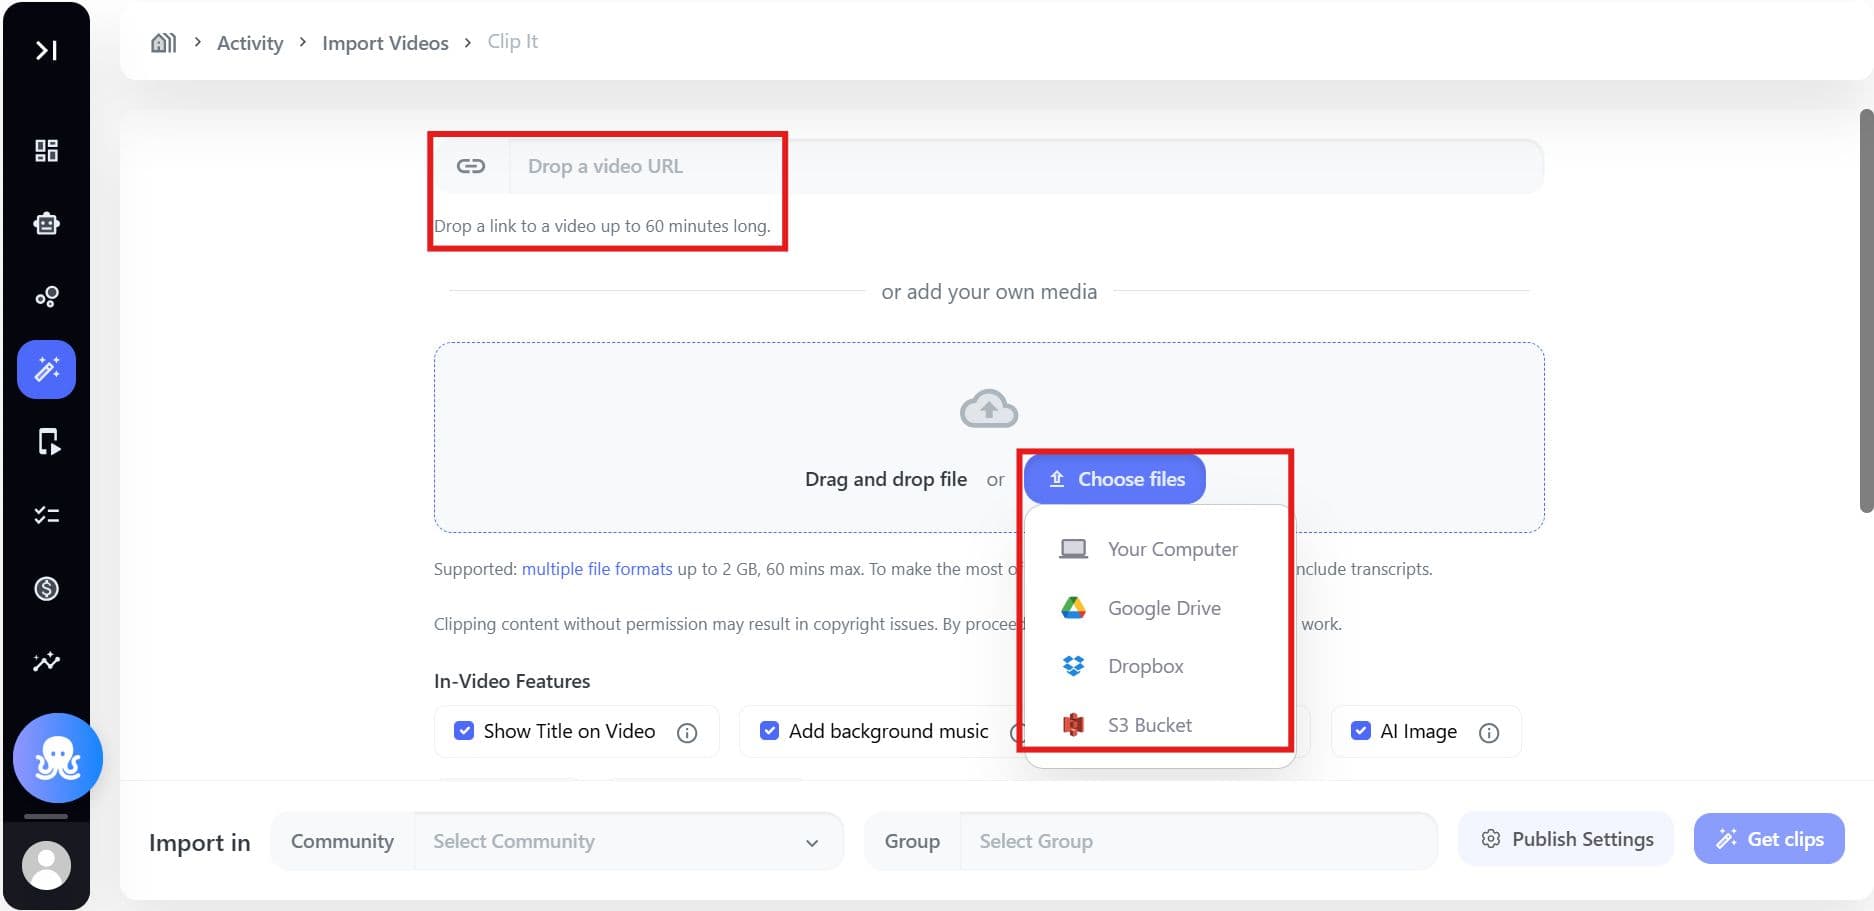
Once you have selected your files or provided the video URL, proceed to choose the desired AI feature, specify the community and groups for Import In, and then click Publish Settings.
Rules:
- 1.5-hour minimum buffer
- Communities/groups mandatory
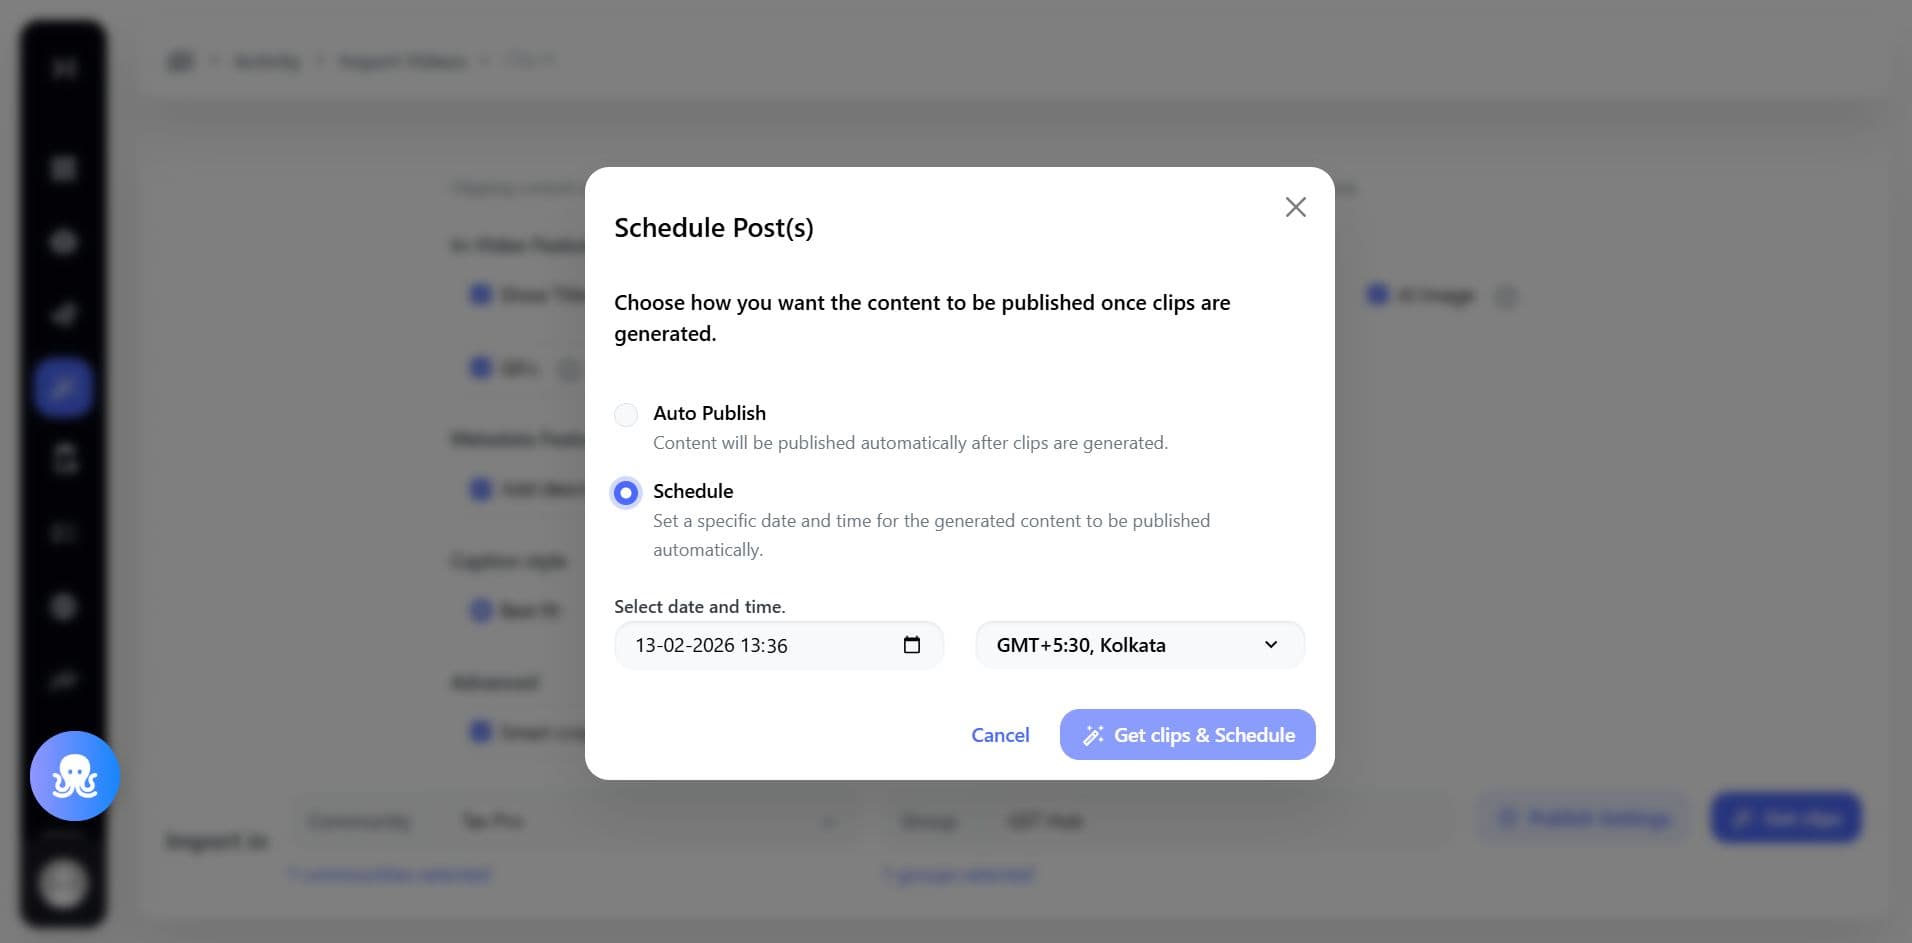
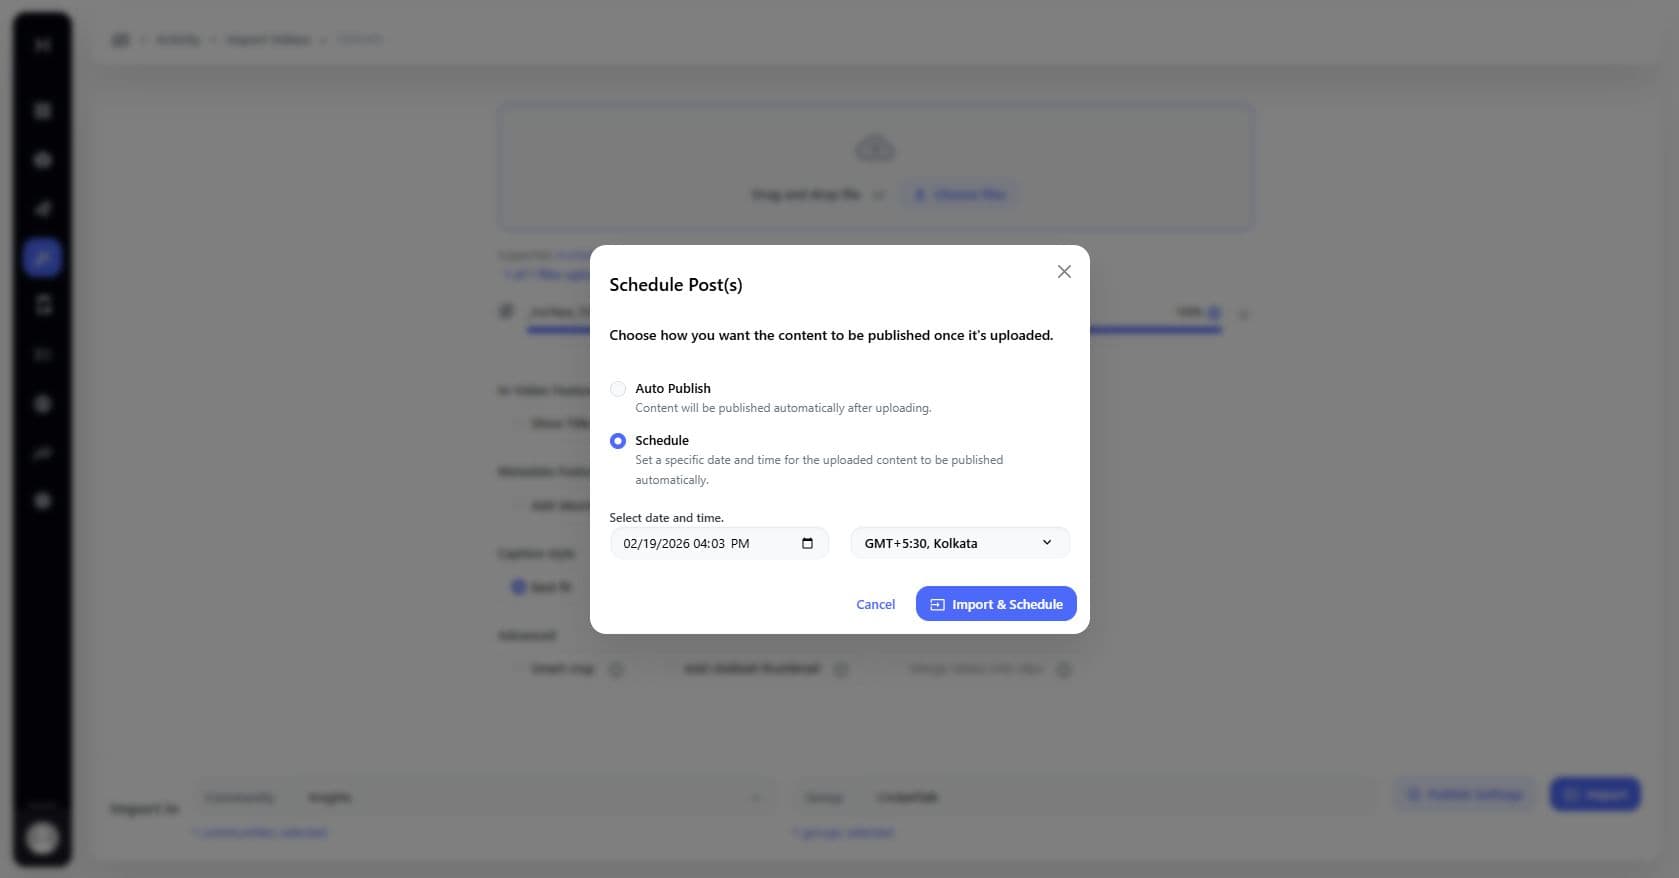
Choose how clips are published after generation: Auto Publish (immediate, automatic publishing) or Schedule (set a specific date, time, and time zone for automatic publishing).
Click Get clips & Schedule when finished.

Schedule / Auto Publish via Uploads
Go to: Curate > Activity > New Post
Click on the Uploads button.
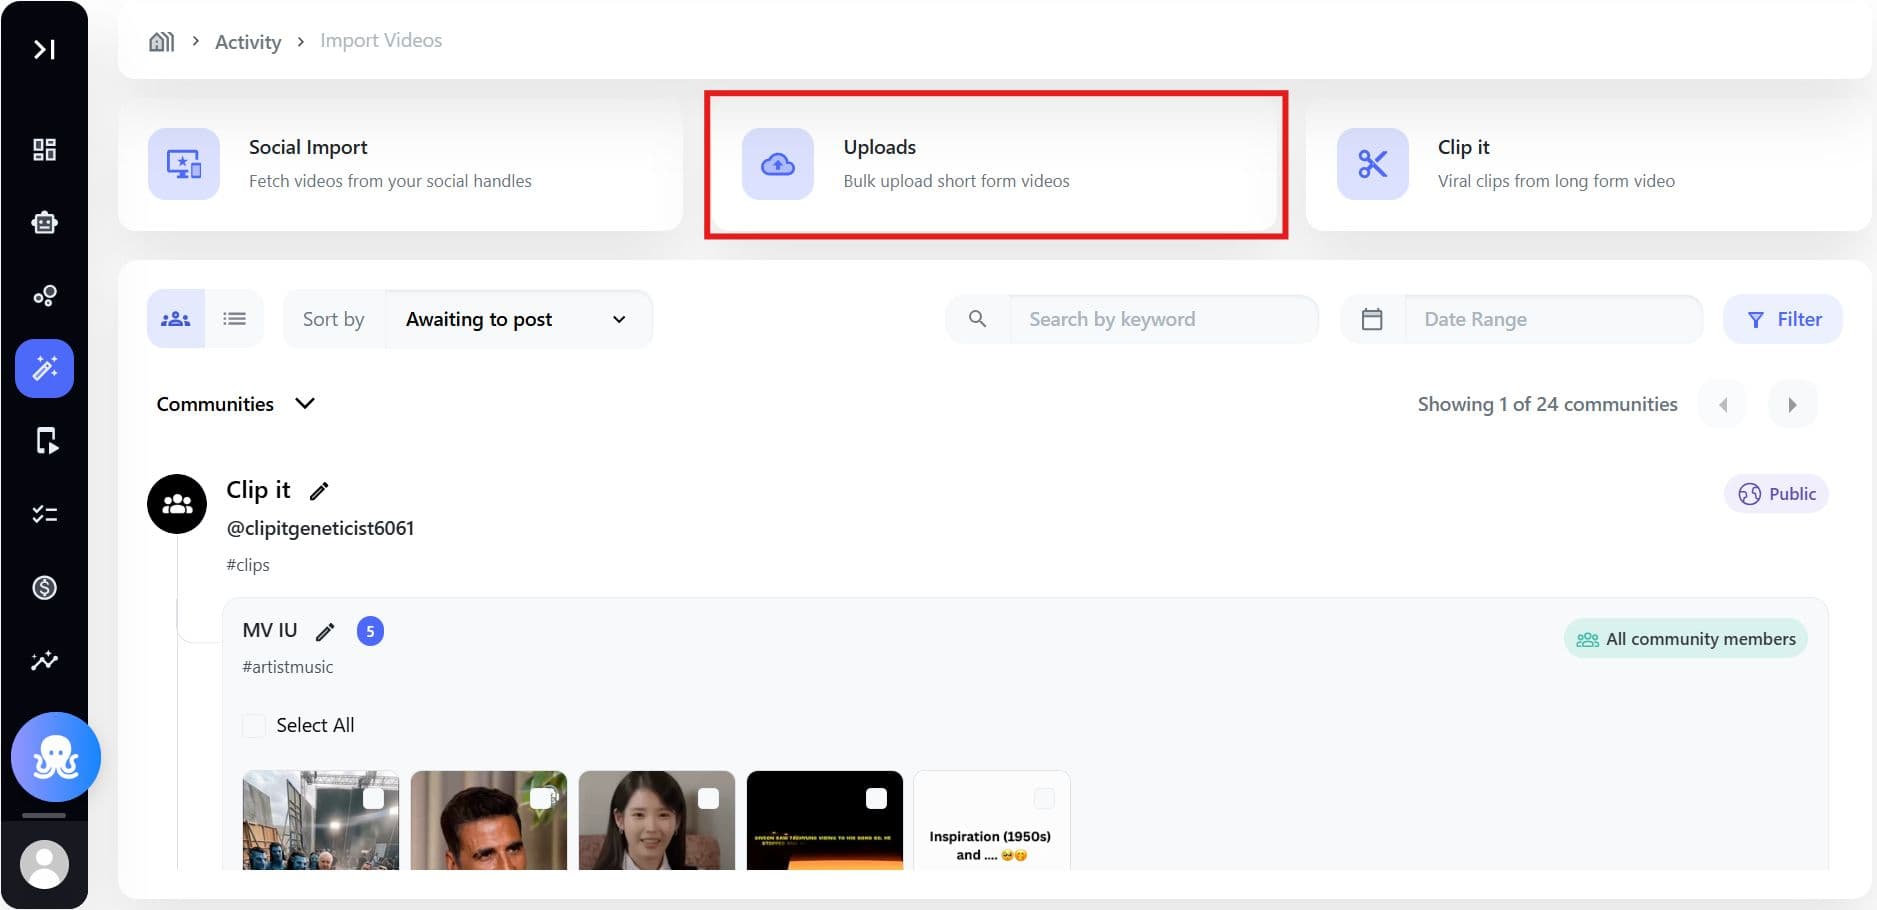
To upload a video, the "Uploads" window will open.
You can select files for upload from your Computer, Google Drive, Dropbox, or S3 Bucket. A pop-up notification, "Videos updated successfully," will confirm the completion of the upload.
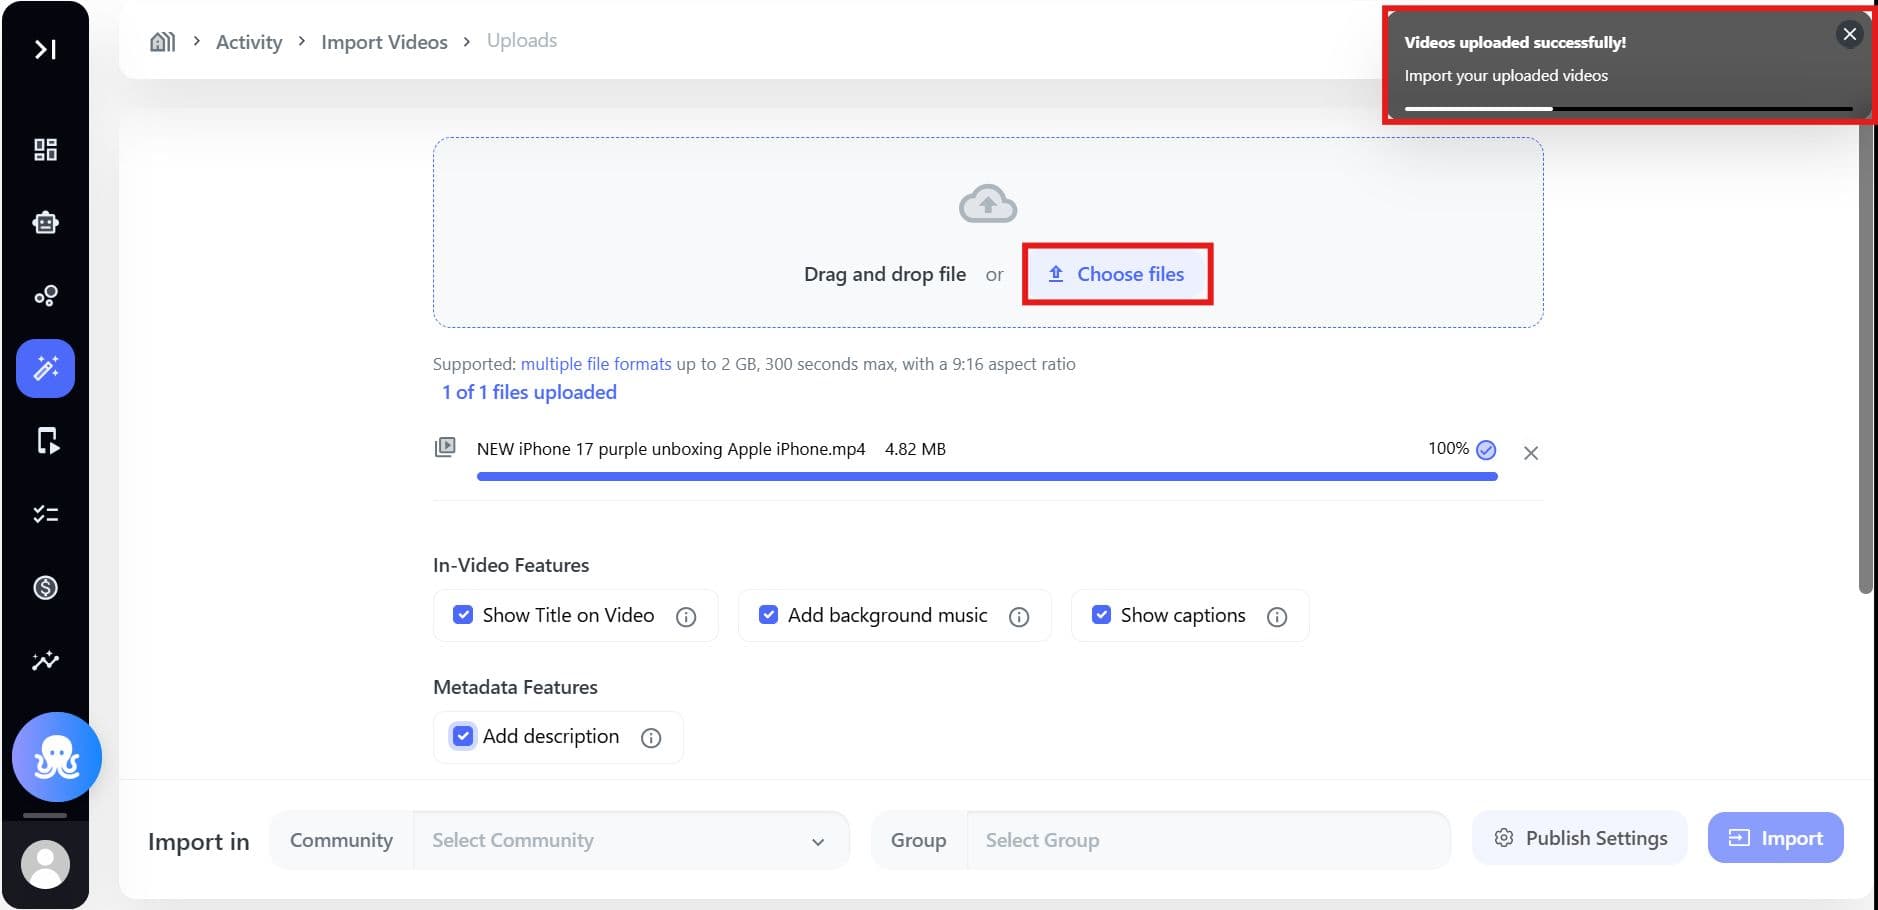
Proceed to choose the desired AI feature, specify the community and groups for Import In, and then click Publish Settings.
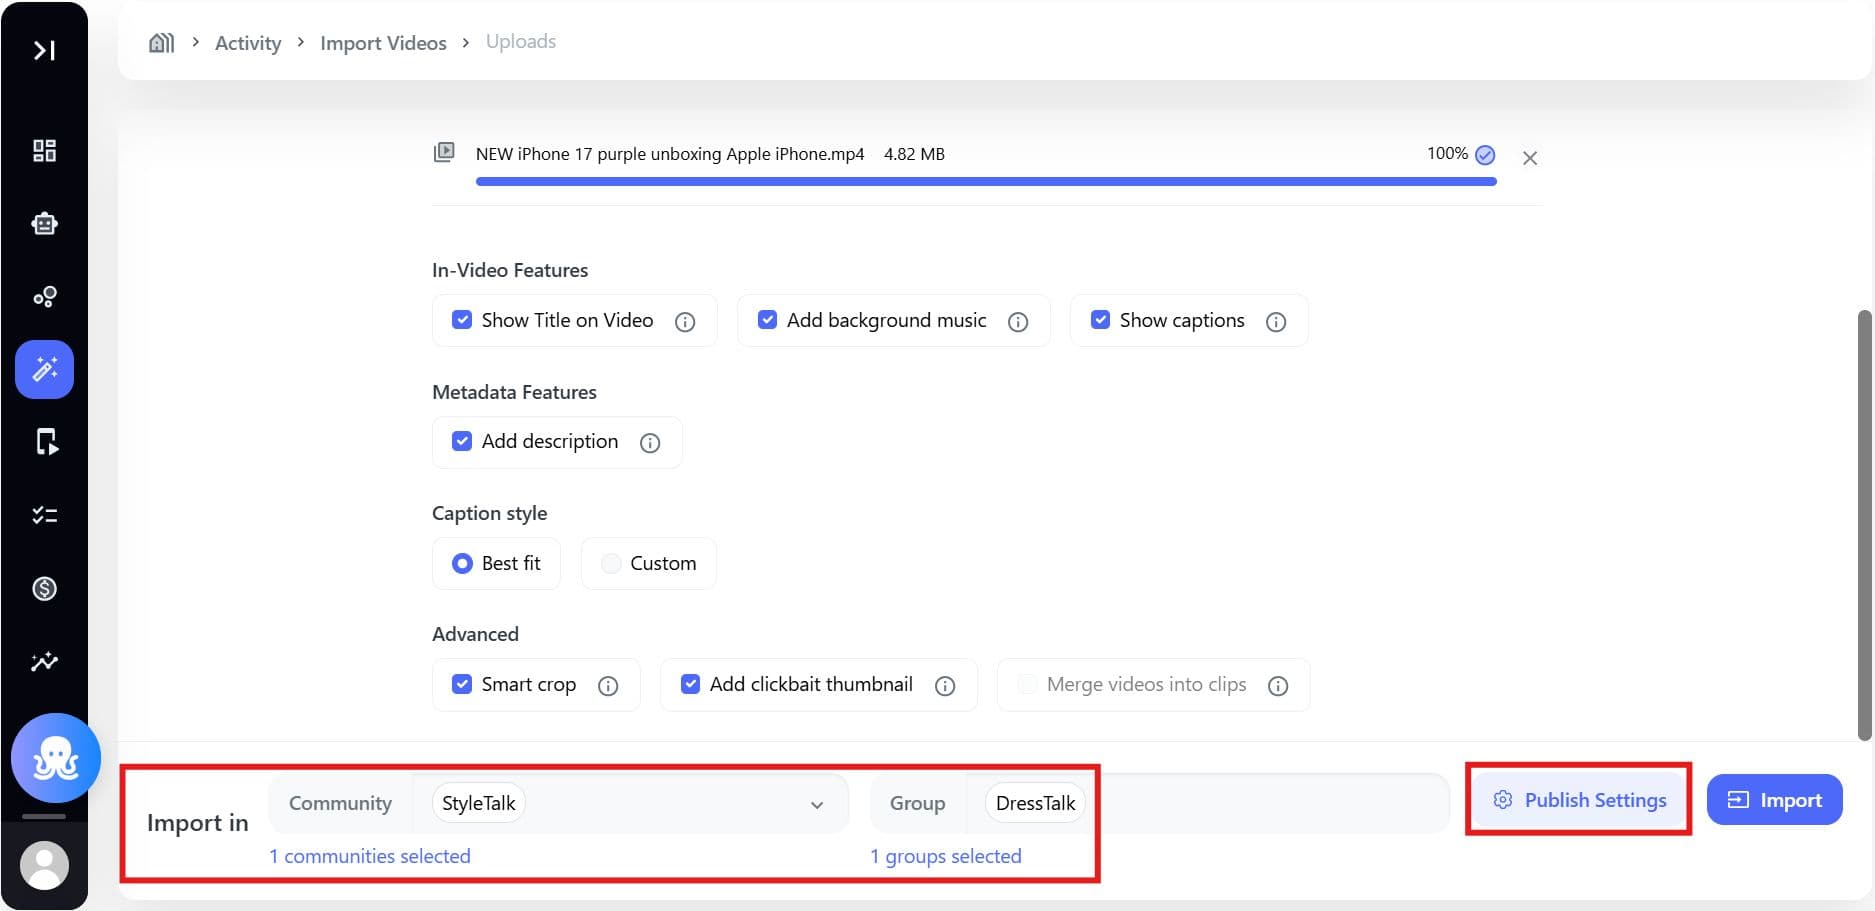
Rules:
- 1.5-hour minimum buffer
- Communities/groups mandatory
Choose how clips are published after generation: Auto Publish (immediate, automatic publishing) or Schedule (set a specific date, time, and time zone for automatic publishing).
Click Import & Schedule when finished.
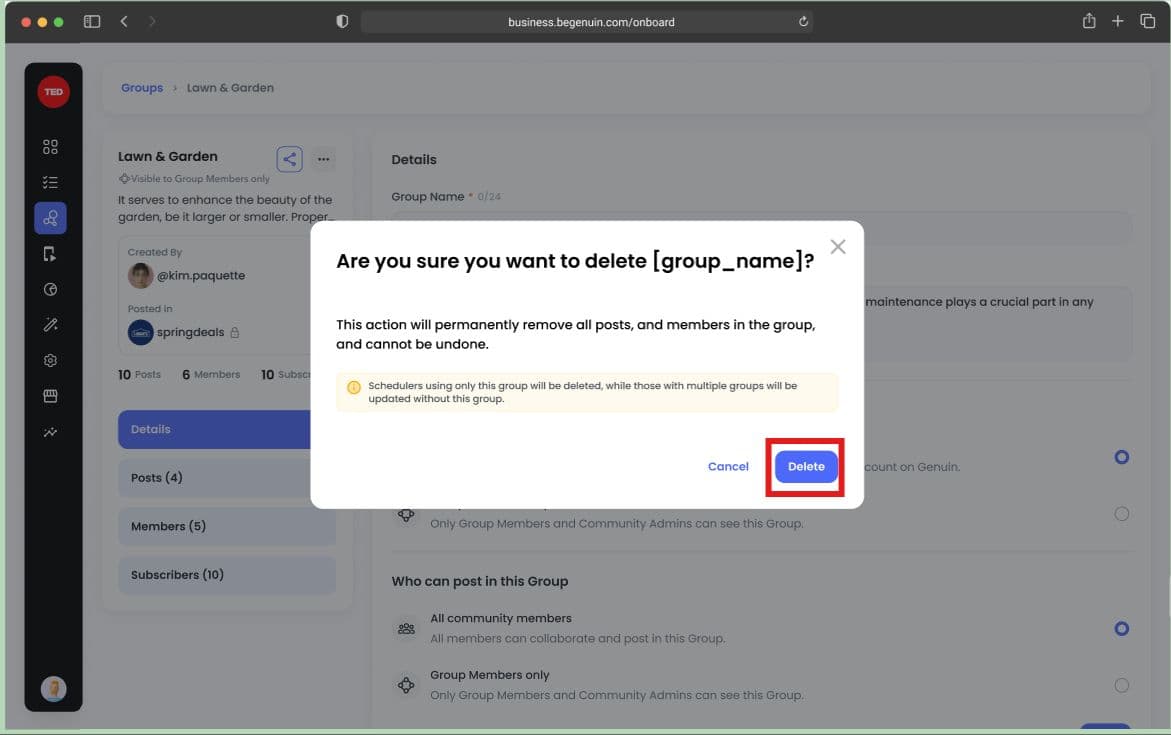
Group Deletion Impact
When a user deletes a group that is part of an active scheduler, the following notifications are generated:
Group is part of a multi-group scheduler (within the same community):
- Notification: "The group {Group Name} was deleted. Your scheduler has been updated to continue with the remaining groups in the community."
- Result: The scheduler remains active, operating on the remaining groups.
Group is the only group associated with the scheduler:
- Notification: "The group {Group Name} was deleted. Scheduler {Scheduler Name} has been removed because it no longer has any groups assigned to it."
- Result: The scheduler is automatically deleted/removed.
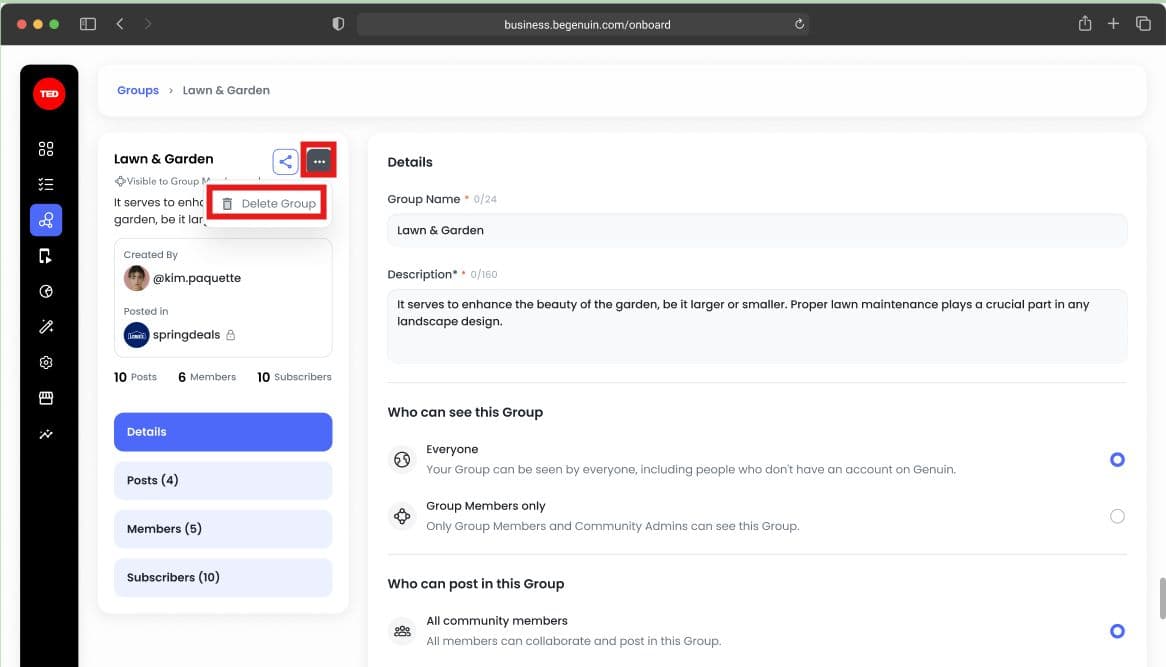
Delete Group Confirmation
Highlight:
- 3-dot menu
- Delete group option
- Confirmation popup
Limitations & Guardrails
- Hourly import does not support scheduled publishing
- Posting Daily not allowed when import Weekly
- Past times cannot be selected
- Buffer rules strictly enforced
- Changes do not apply retroactively
- A handle cannot run overlapping imports
Final Summary
Scheduler transforms Brand Control Center from a manual publishing tool into a structured automation engine.
It provides:
- Scalable social import automation
- Controlled publishing strategies
- Intelligent validation rules
- Enterprise-grade governance
- Post-level override control
You define the cadence. Brand Control Center executes reliably.
