Can Your Users Log in Seamlessly Across Your Brand Ecosystem Using SSO?
Managing user authentication across multiple digital properties can create friction for users if they are required to repeatedly sign in. Single Sign-On (SSO) solves this challenge by allowing users to authenticate once and access multiple experiences without additional logins.
In the Brand Control Center, you can configure SSO so users authenticated through your identity provider are automatically recognized when accessing your community experience through the Genuin platform.
This guide explains how to configure SSO in BCC, including required credentials, OAuth/OIDC configuration, user information mapping, and callback URL setup.
What This Setup Enables
Once configured, SSO allows:
- Users logged into your website or app to access the community without logging in again
- Centralized identity management through your authentication provider
- Secure authentication using OAuth / OpenID Connect (OIDC) protocols
- Automatic authentication within the Genuin SDK
Supported Authentication Protocol
The current SSO configuration in Brand Control Center (BCC) supports:
| Protocol | Description |
|---|---|
| OAuth | Secure authorization framework used to grant access to applications |
| OpenID Connect (OIDC) | Authentication layer built on top of OAuth for identity verification |
Step 1: Access the SSO Setup in BCC
To begin configuring SSO:
- Log in to the Brand Control Center (BCC) https://brands.begenuin.com
- Open your Brand Account
- Navigate to: Settings > Setup Single Sign-On (SSO)
This opens the SSO configuration form where authentication details must be provided.
Step 2: Retrieve Required Credentials from Auth0
Before completing the BCC form, you must retrieve credentials from your identity provider.
Example provider used in this guide: Auth0
Steps:
- Log in to your Auth0 dashboard (https://manage.auth0.com)
- Navigate to: Applications > Settings

From this page, retrieve the following details.
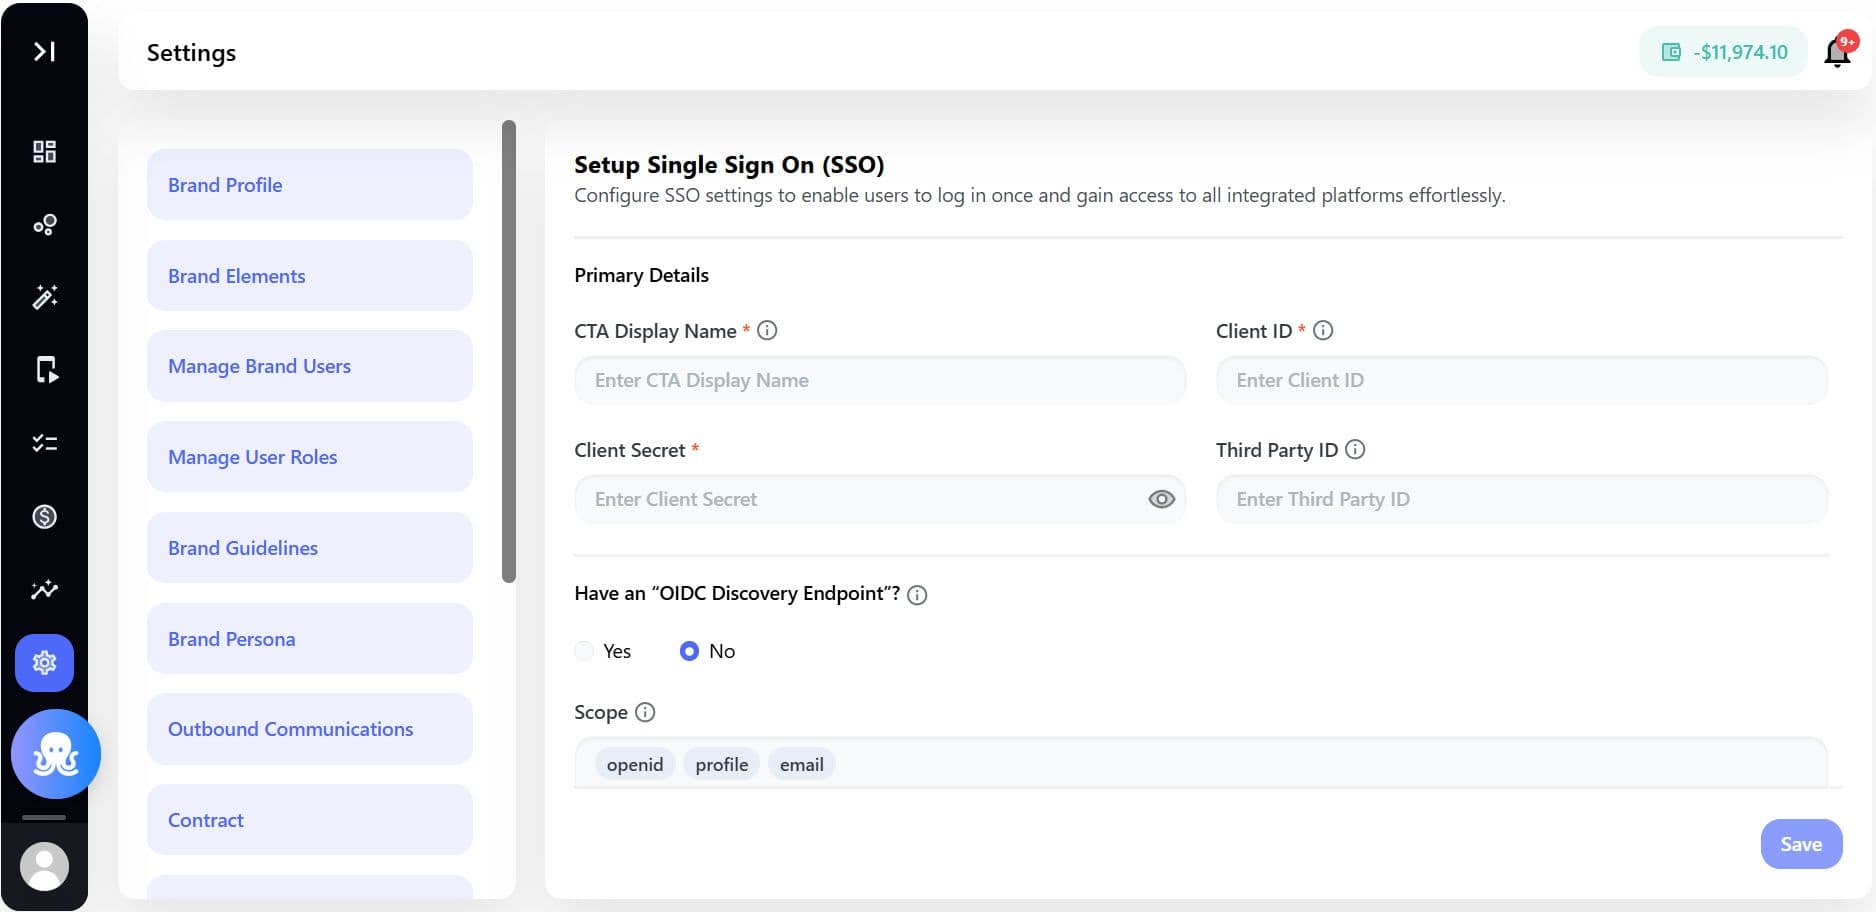
Step 3: Enter Primary SSO Details in BCC
Fill the following fields in the BCC SSO configuration form.
| Field | Description |
|---|---|
| CTA Display Name | The name shown on the SSO login button |
| Client ID | Unique identifier of your application from Auth0 |
| Client Secret | Security credential used for authentication validation |
| Third Party ID (Optional) | Used if integrating with additional third-party services |
These credentials allow BCC to securely connect to your authentication provider.
Step 4: Configure Authentication Endpoint
Next, determine whether your application supports OIDC Discovery.
BCC supports two configuration paths:
- OIDC Discovery Endpoint (Recommended)
- Manual OAuth Endpoint Configuration
Option A: OIDC Discovery Endpoint Available
If your authentication provider supports an OpenID Connect Discovery Endpoint, this is the simplest configuration.
Step 1: Enable OIDC in BCC
Set the OIDC Discovery Endpoint option to Yes.
Step 2: Retrieve the OpenID Configuration URL
From your Auth0 dashboard, copy the OpenID Configuration URL.
Step 3: Add the Discovery Endpoint in BCC
Paste the URL into the OIDC Discovery Endpoint field in BCC.
Example structure:
https://example.auth0.com/.well-known/openid-configuration
Optional: You may append static query parameters to this URL if required.
Step 4: Configure Scopes
Scopes define the permissions granted during authentication.
Typical default scopes include:
| Scope | Purpose |
|---|---|
| openid | Required for OpenID Connect authentication |
| profile | Access to basic user profile information |
| Access to the user’s email address |
To see all available scopes:
- Open the OpenID Configuration URL in a browser
- Locate the key: scopes_supported
Add the relevant scopes in the BCC SSO configuration form.
Step 5 (Optional): Add Extra Body Parameters
If your authentication method uses POST, you can add dynamic parameters such as:
| Parameter | Example Purpose |
|---|---|
| source | Identifies which property the user came from |
| os | Detects device OS (Android or iOS) |
These parameters help track user origin across your owned properties.
Option B: OIDC Discovery Not Available
If your identity provider does not support OIDC discovery, configure OAuth endpoints manually.
Step 1: Disable OIDC Discovery
Set the OIDC Discovery Endpoint option to No in BCC.
Step 2: Enter Authorization Endpoint
Retrieve the OAuth Authorization URL and enter it in the Authorization Endpoint field.
Example usage: This endpoint authorizes users for access to your application.
Optional additions:
- Static query parameters (example: o2v=2)
- Dynamic parameters such as state
Step 3: Enter Token Endpoint
Retrieve the OAuth Token URL from Auth0.
Add this to the Token Endpoint field.
This endpoint is responsible for returning the authentication token after successful login.
Optional dynamic parameters can also be added, such as: callbackurl
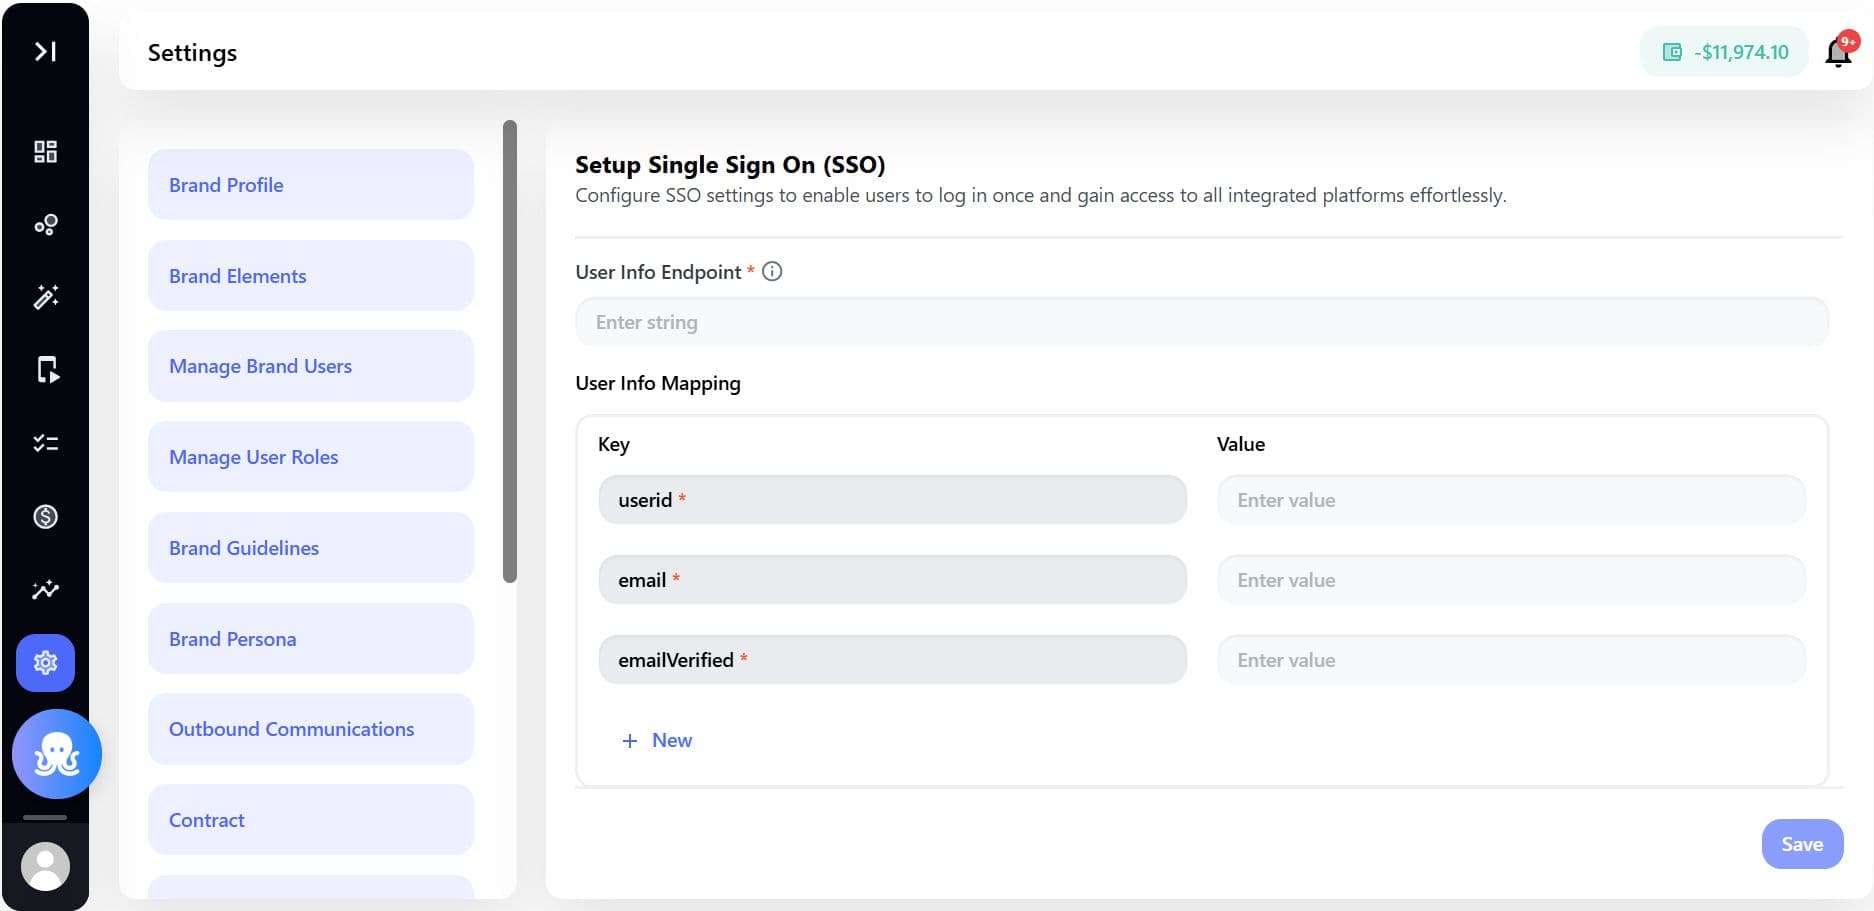
Step 4: Enter User Info Endpoint
Retrieve the OAuth User Info URL.
Enter it in the User Info Endpoint field.
This endpoint returns user details after authentication.
Step 5: Configure User Information Mapping
After authentication, Genuin retrieves user profile data.
You must define how fields from the identity provider map to user attributes in BCC.
Retrieve Supported Claims
- Open the Authorization URL in your browser
- Locate the JSON field: claims_supported
These claims define the user attributes available from the provider.
Required Mapping Fields
Map the following keys in the BCC SSO form.
| BCC Field | Example Claim |
|---|---|
| userid | sub |
| emailVerified | email_verified |
Additional Supported User Fields
You may also map additional user attributes.
| Attribute | Description |
|---|---|
| Age | User age |
| Bio | User description |
| Birthdate | Date of birth |
| Country Code | Country identifier |
| Gender | User gender |
| Mobile | Mobile number |
| Is Mobile Verified | Verification status |
Nested User Data Support
If the response structure contains nested objects, nested paths can be used.
Example: data.data.id
This allows BCC to correctly extract the required value from nested JSON responses.
Step 6: Configure Allowed Callback URLs
Callback URLs define where users are redirected after successful authentication.
These must be configured in your identity provider.
Add Callback URLs in Auth0
Enter the URLs provided by Genuin.
QA Environment (Testing)
https://api.qa.begenuin.com/api/v4/thirdparty/callback
https://nodejs.qa.begenuin.com/api/v4/thirdparty/callback
Production Environment
https://api.begenuin.com/api/v4/thirdparty/callback
https://nodejs.prod.begenuin.com/api/v4/thirdparty/callback
Enter all URLs as comma-separated values.
Step 7: Save and Test the Configuration
After completing the setup:
- Save the SSO configuration in BCC
- Ensure callback URLs are added in Auth0
- Test the login flow
Verify that users can successfully authenticate through the SSO provider.
What Happens After SSO Is Enabled?
Once SSO integration is successfully configured:
- Users logged into your brand’s ecosystem will automatically authenticate within the Genuin SDK
- No additional login prompts will appear
- Authentication is securely handled through your identity provider
This creates a seamless login experience across your entire brand ecosystem.
Final Thoughts
Configuring Single Sign-On (SSO) in the Brand Control Center enables brands to unify authentication across their digital properties.
By integrating with identity providers using OAuth or OpenID Connect, brands can:
- Deliver frictionless user experiences
- Maintain centralized authentication management
- Improve security and access control
Once configured, the Genuin platform automatically recognizes authenticated users, ensuring smooth and secure access to your brand’s community experiences.
